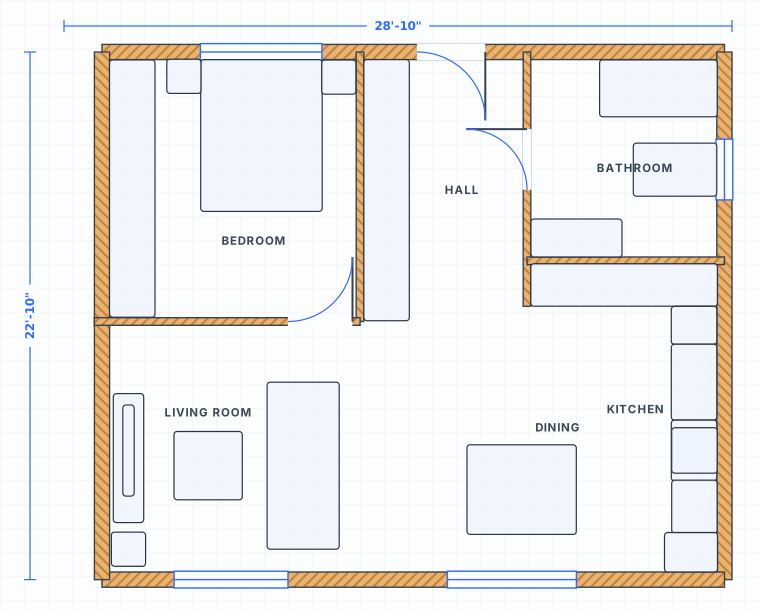
Small House
90 m²
A cozy single-level small house plan ideal for starter homes and cottages.
Use TemplateCreate a floor plan for free, no software, no signup. Just open the editor and start drawing.
 to scale
Plenty of floor plan tools are free until the moment the plan becomes useful, then ask for a card. SpacePlanner is free to draw with and free to keep drawing with. Open the editor and start a plan without an account at all. A free account only comes into it when you want to save the plan to your projects, export it as an image or send it to someone else. There is no download, no licence key and no CAD experience required, because you are typing wall lengths rather than writing geometry.
Creating the drawing takes twenty minutes. The measuring is what makes it worth having. Take each wall at about waist height, above the baseboard and below the sills, and write the figure down before moving on. Measure the whole wall in one run where you can, rather than adding up short sections, because small errors compound as you go round a room. Then check the corners. Very few existing rooms are truly square, and a plan drawn as if they were will be wrong in a way that only shows up when the wardrobe arrives.
A plan earns its keep by answering questions before anyone lifts anything. Whether the sofa clears the door. Whether the extension leaves a usable kitchen. Whether the second bedroom still works with a desk in it. Because everything is drawn at real size you can test all three on screen. Add stairs and the plan carries on to the floor above. Draw the garden or the patio on the same canvas and the house stops stopping at the back door.
Walk the space and draw a rough outline on paper, one room at a time. It does not need to be to scale. Its job is to give you somewhere to write every measurement down as you take it.
Take each wall in one run at about 36 in (91 cm) above the floor. Record door and window widths and how far each one sits from the nearest corner. Check the diagonals in any room you are not sure about.
Open the editor and type the wall lengths in. The outline is built from measurements rather than from dragging, so the shape on screen closes on the same figures you wrote on the sketch.
Add doors, windows, fixtures and furniture at real sizes. Compare a couple of dimensions on screen against the tape one last time, then save, export or share the finished plan.
Creating a floor plan of an existing home is a small survey. The figures below are the working standards for that survey: the tolerance to measure to, the height to measure at, the checks that catch an out of square room, and the fixed heights worth noting while you are in there. Take these once, properly, and you will not have to go back with a tape a second time.
| Measure | Imperial | Metric | Why it matters |
|---|---|---|---|
| Tolerance to record wall lengths at | 1/4 in | 6 mm | Round the same direction every time so errors do not compound. |
| Height to take a wall length at | 36 in | 91 cm | Above the baseboard, below sills, radiators and worktops. |
| Squareness check, 3-4-5 triangle at a corner | 3, 4 and 5 ft | 0.9, 1.2 and 1.5 m | Mark 3 along one wall and 4 along the other. If the hypotenuse is not 5, the corner is not 90 degrees. Draw it as found. |
| Squareness check by diagonals, rectangular room | agree within 1/2 in | agree within 12 mm | Measure corner to corner both ways. Unequal diagonals mean the room is out of square. |
| Acceptable closure error round a room | 1/2 in in 20 ft | 12 mm in 6 m | Opposite walls should agree within this. If not, measure again. |
| Ceiling height, taken at two corners | 8 ft | 2.44 m | Typical for a modern home. Older floors and ceilings both slope. |
| Wall thickness, read at a door reveal | 4.5 in | 11.5 cm | A stud partition. Exterior walls run 6.5 in to 12 in. |
| Door leaf plus casing each side | 30 in leaf, 2.5 in casing | 76 cm leaf, 64 mm casing | The casing is why a door needs more wall than its leaf width. |
| Window sill and head heights | 36 in and 80 in | 91 cm and 203 cm | Sill height decides what furniture can sit under the window. |
| Baseboard or skirting | 3.5 in high, 3/4 in proud | 89 mm and 19 mm | It holds furniture off the wall, which eats into a tight fit. |
| Power outlet centre height | 15 to 18 in | 38 to 46 cm | Note the ones a desk, a TV wall or an appliance depends on. |
| Light switch centre height | 48 in | 122 cm | The usual maximum reach height. Mark switches near door swings. |
| Radiator projection from the wall | 4 to 6 in | 10 to 15 cm | Plus the space it needs clear in front. Easy to forget in plan. |
Click to place walls with live dimensions and smart snapping. Everything stays to scale.
A library of standardized furniture and fixtures at real-world sizes: beds, sofas, kitchens, baths and more.
Export to image or structured data when you are ready, perfect for sharing or rendering.
Open the editor and start drawing immediately. Create an account only when you want to save.
Make floor plans online for free with no signup. Draw rooms, walls, doors and furniture in your browser. Start instantly.
Draw a floor plan online for free in your browser. Walls, doors, furniture and live dimensions. No signup, no download.
Draw 2D floor plans online for free. Precise walls, doors, furniture and dimensions in your browser. No signup needed.
Create a floor plan online for free. Draw rooms, walls, doors, furniture, gardens and outdoor areas directly in your browser. No signup needed.
Yes. Creating floor plans in SpacePlanner is free. There is no trial, no download and no signup needed to start drawing.
No. You click to place walls and drag furniture into place — the tool keeps everything to scale, so no CAD skills are required.
Yes. Open a ready-made template such as a small house or one-bedroom apartment and adapt it, or start from a blank canvas.
You can create a full plan as a guest. Create a free account to save it to your projects and open it again from any browser.
Work to the nearest 1/4 in (6 mm) and you are well inside what matters for a floor plan. The risk is not one imprecise wall, it is compounding: three sections added together, each rounded a different way, can put a wall several inches out. Measure long walls in a single run where the tape allows, and cross-check by measuring the opposite wall. If the two disagree by more than about 1/2 in over 20 ft, one of them is wrong.
Draw it as it is. Check with a 3-4-5 ft (0.9-1.2-1.5 m) triangle at each corner, or measure both diagonals of the room, and if they differ by more than about 1/2 in (12 mm) then the room is out of square. Older houses very often are. Enter the wall lengths you actually measured rather than forcing right angles, because the out of square corner is exactly where a wardrobe or a run of cabinets will fail to fit. A plan that quietly squares everything up is the plan that surprises you later.
Yes. Draw the ground floor first, then add stairs and build the level above on top of it. Keeping both levels in one plan is what lets you see whether the stair lands somewhere sensible and whether the bathrooms stack. You can also draw outdoor space such as a garden, patio or driveway on the same canvas, so the whole property stays in a single project rather than several disconnected drawings.
No signup, no download. Open the editor and start drawing in one click.
Start Drawing Free