Drawing
How to add doors and windows
Doors and windows sit inside a wall. Hover a wall to preview where one goes, then click to drop it in. They show in 2D, in 3D, in elevations and on exports.
Each tool opens a style gallery with exact sizes. Every style can be resized after you place it.
Add a door
Open Door Styles
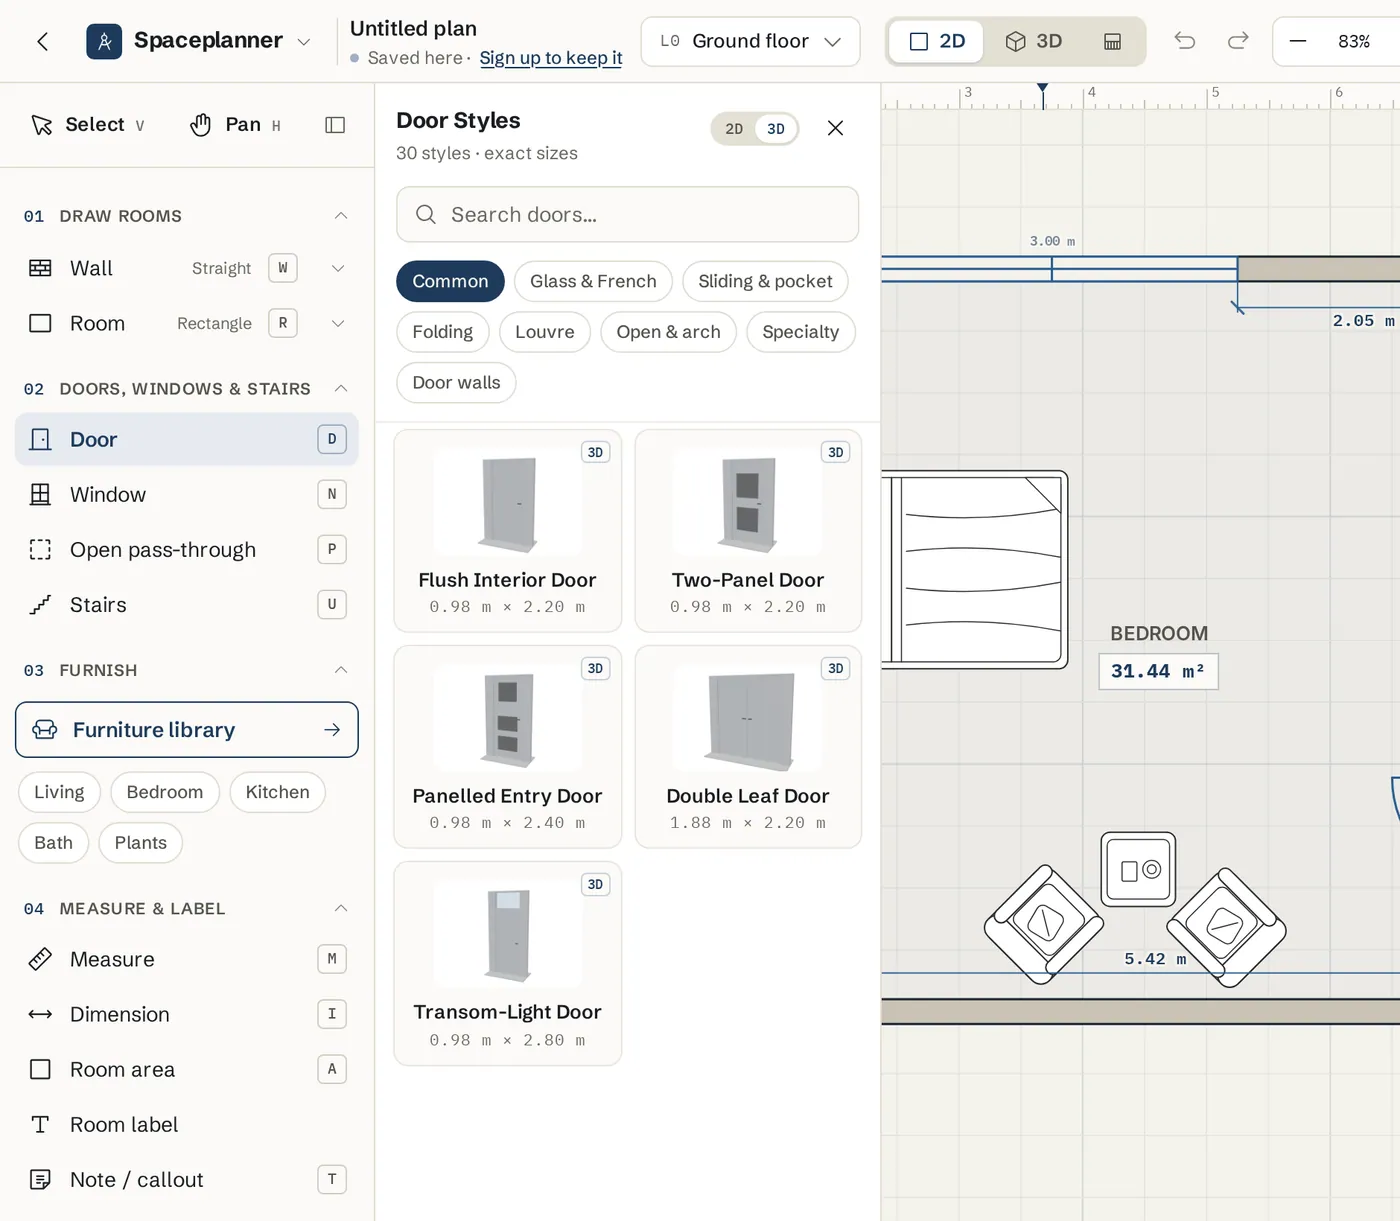
Press D, or click Door in the left toolbar under Openings & circulation. The Door Styles gallery opens with tabs such as Common, Glass & French, Sliding & pocket and Folding.
Pick a style
Click a style, or search, for example sliding or pocket. You can skip this: clicking a wall with no style picked places a standard door.
Click a wall
Hover a wall to see the door and the wall lengths on each side of it. Click to place it. Each click places one door, then the editor goes back to Select. Press D again for the next one, or select a door and press Ctrl+D to duplicate it.
Add a window
Open Window Styles
Press N, or click Window in the left toolbar. The Window Styles gallery has Rectangular, Round, Halfround, Arched, Triangular and Various styles.
Place it
Pick a style, then click a wall. Each click places one window and returns to Select, so press N again for the next one.
Change size, swing, hinge and height
Select the door or window
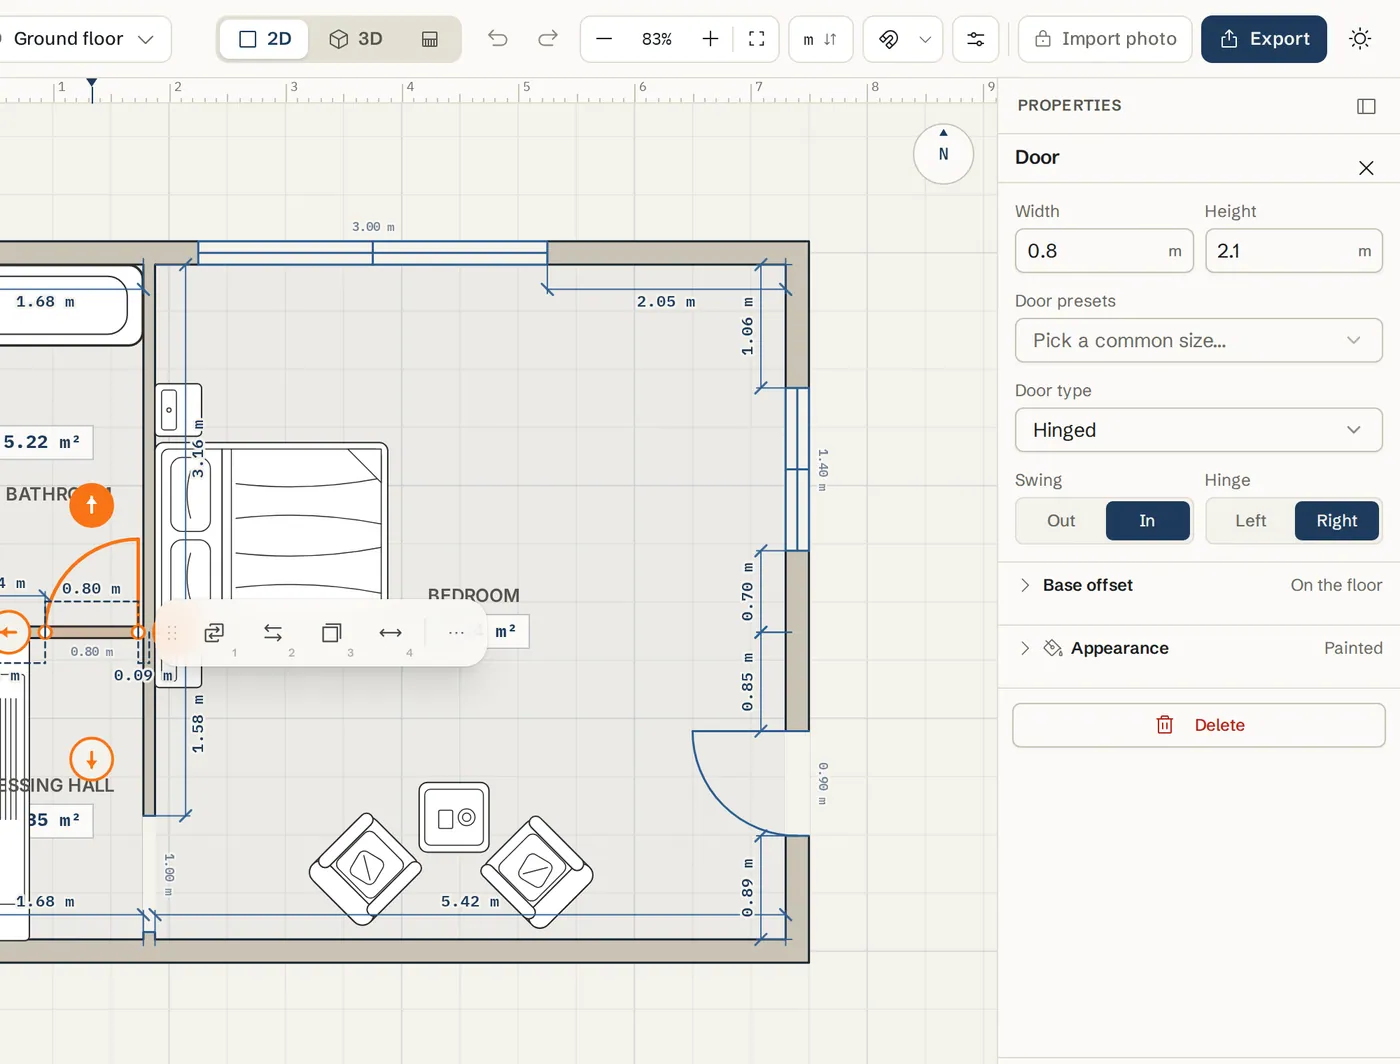
With Select (V), click it. Its panel opens on the right.
Set the size
Type a Width and Height, or pick a common size from Door presets (Closet, Bathroom, Standard, Wide, Accessible, Double) or Window presets (Small, Standard, Wide, Picture, Bay). You can also type it on the plan: double-click the width or height figure in the blue label next to the door or window (or click it once the door or window is selected; on a phone, tap it), type the new value and press Enter. Esc cancels.
Flip the swing and hinge
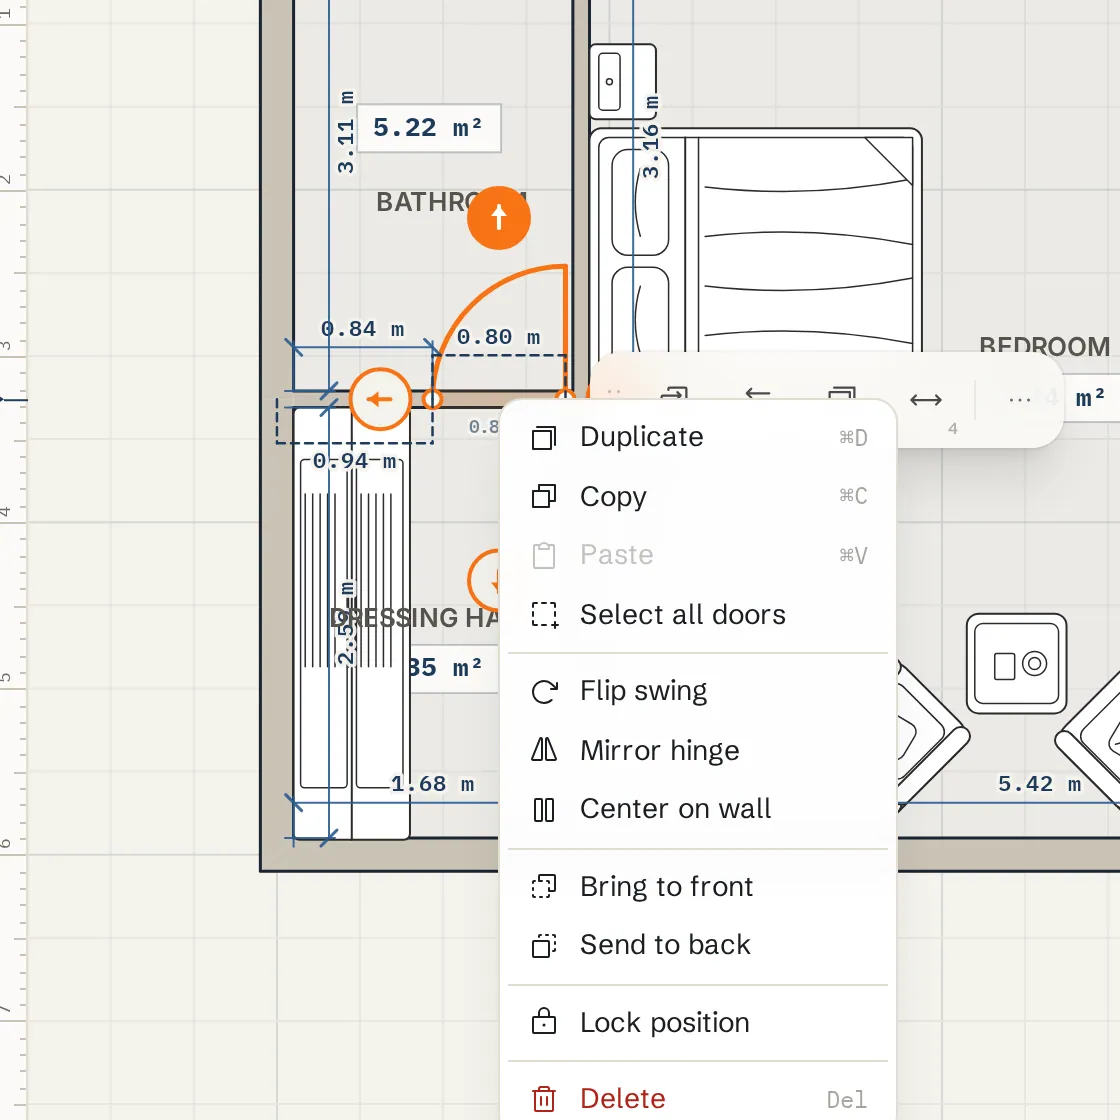
For a door, set Swing to In or Out, and Hinge to Left or Right. Or right-click the door and choose Flip swing or Mirror hinge.
Change the door type
Under Door type pick Hinged, Sliding, Folding, Pocket, Double, Open / archway, Garage, Elevator or Revolving.
Set the window sill height
For a window, type the Sill height: the distance from the floor to the bottom of the window. With the Sill Heights layer on, the sill figure on the plan can be typed into the same way as the width and height.
Move or centre it
Drag it along the wall. Right-click and choose Center on wall to put it exactly in the middle.
Raise it off the floor
Open Base offset and type a Base offset (from floor) to lift the whole door or window, for example a door onto a step.
Colour and frame
For a window open Frame appearance and choose a Frame material (Standard (white), Metal, Wood) and a Frame color. For a door open Appearance and choose a Door color.
Swap the style
Click Replace door or Replace window in the actions bar beside the selection and pick a new style. The size and colours you chose are kept.
Space windows evenly on a wall
Select the windows
With Select (V), box-select two or more windows or pass-throughs on the same wall, or Ctrl-click each one. The Spacing on wall buttons appear in the selection panel on the right.
Equal spacing
Click Equal spacing. The first and last window stay where they are and the ones between move so every clear gap, frame to frame, is the same. It needs three or more, and windows of different widths still get equal gaps.
Distribute across the wall
Click Across wall to spread them over the whole wall, with the same gap to each wall end, measured from the inside of the corners. A door or window you did not select limits the stretch they spread over.
Check the gaps
Green dimensions show every gap while the windows stay selected. Ctrl+Z puts all of them back in one step. Both actions are also in the right-click menu.
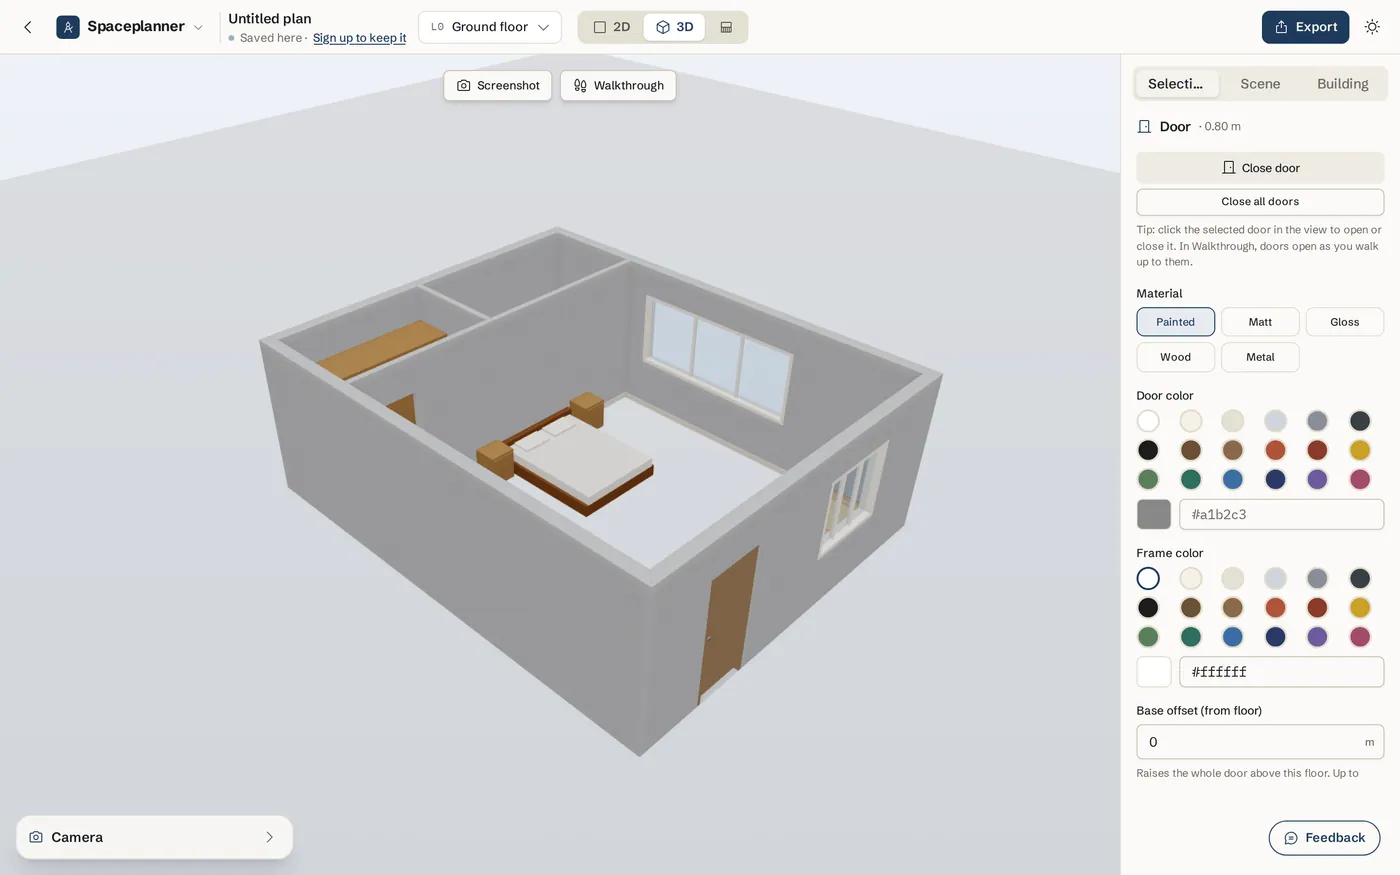
Open doors in 3D
Switch to 3D
Click 3D in the top bar.
Open a door
Click a door to select it, then click it again to open or close it. Open all doors in the right panel opens them all. In Walkthrough, doors open as you walk up to them.
Tips
- Doors and windows are exactly as deep as their wall, so they always fill the wall opening.
- For an opening with no door at all, like an arch or a kitchen hatch, use a pass-through (P). See Pass-throughs.
- Click the three dots in the actions bar beside a selected door or window and choose Full-length dimension to add the whole wall length as a dimension.
- In the Elevation view you can drag doors and windows along a wall face on, with live clearance dimensions. See Elevations.
Common problems
- The door opens the wrong way
- Select it and change Swing (In or Out) and Hinge (Left or Right), or right-click and use Flip swing and Mirror hinge.
- I keep adding doors when I only wanted one
- Each click places one opening and the editor switches back to Select. Press D or N again to add the next one.
- The door will not go where I click
- Doors and windows only go on walls. Hover right over the wall line until the preview appears, then click.
- Equal spacing says there is not enough room or something is in between
- Nothing moves when the windows cannot fit with equal gaps. Make the windows narrower or select fewer. If another door or window, or a wall joining this one, sits between them, select that opening too or space each side separately.
- My window is too high or too low
- Change Sill height in its panel. The window keeps its height and moves up or down.
Related topics
- Pass-throughs & archesCut an open gap in a wall: plain or cased opening, an arch, or a counter hatch.
- WallsDraw straight walls corner to corner, type exact lengths, and set thickness, height and corner join.
- ElevationsSee every side of the building face on, move doors and windows on the facade, and print elevation sheets.
- 3D view & walkthroughSee the same plan in live 3D, light it, look inside, save views, walk through it and turn a view into a realistic photo.
- StairsPlace a stair, shape it in the Stair configurator, give it finishes and connect it from one floor to another, up or down.
Try it on a real plan
Free, in your browser. No sign-up needed to start.