Building features
How to add a roof: pitched, flat or pergola
A roof is an outline on the plan. SpacePlanner works out the ridges, hips and valleys from that outline and builds the roof in 3D. On the 2D plan you see it as dashed lines.
The Roof tool starts with three choices. Flat and Pitched put a roof on your outside walls in one click; it follows the walls and moves when they move. Draw outline is for a roof that covers only part of the house, or has a shape of its own.
When you add a floor on top, the roof moves up to the new top floor for you.
Open the Roof panel
Go to the right floor
A roof sits on the walls of the floor you are on. For the main roof, switch to the top floor first with Floors in the top bar or Alt+Up.
Open Roof
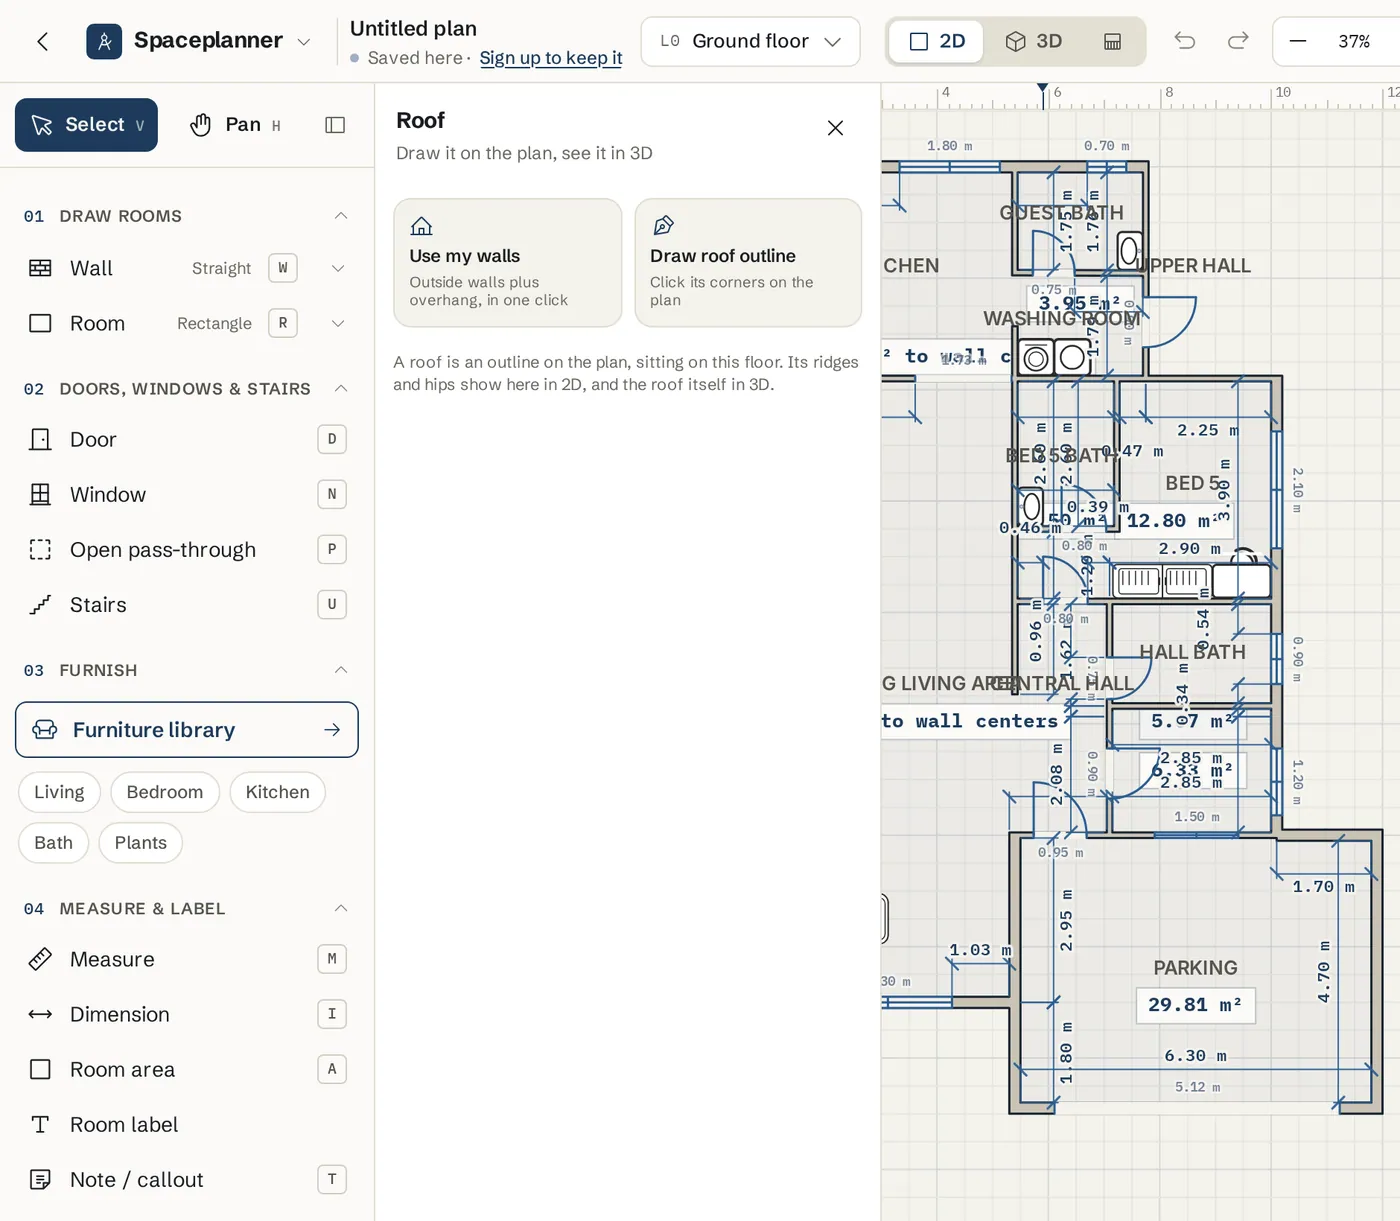
Press Shift+R, or click Roof in the left toolbar under Structure. It starts with a small choice: Flat, Pitched or Draw outline. Once the floor has a roof, the Roof panel opens with its settings.
Switch floors if asked
If you are not on the top floor, the panel says Roofs usually go on the top floor. Switch to and the floor name. Click Switch for the main roof. Stay where you are for a porch or a single storey part.
Add a flat or pitched roof on your walls
Click Flat or Pitched
Click Flat for a flat concrete roof, flush with the walls. Click Pitched for a gable roof with a 45 cm overhang. The roof appears over the outside walls and follows them, so it updates when you move them. You can change the type afterwards.
Close the walls first if needed
If you see Your walls don't close a shape yet, the outside walls have a gap. Close it, or draw the roof outline instead.
Edit the corners by hand
To reshape a wall roof yourself, select it and click Edit its corners instead. It stops following the walls and becomes a drawn outline.
Draw a roof outline
Click Draw outline
Click Draw outline. The panel steps aside on your first click on the plan, so you can see what you are tracing.
Click each corner
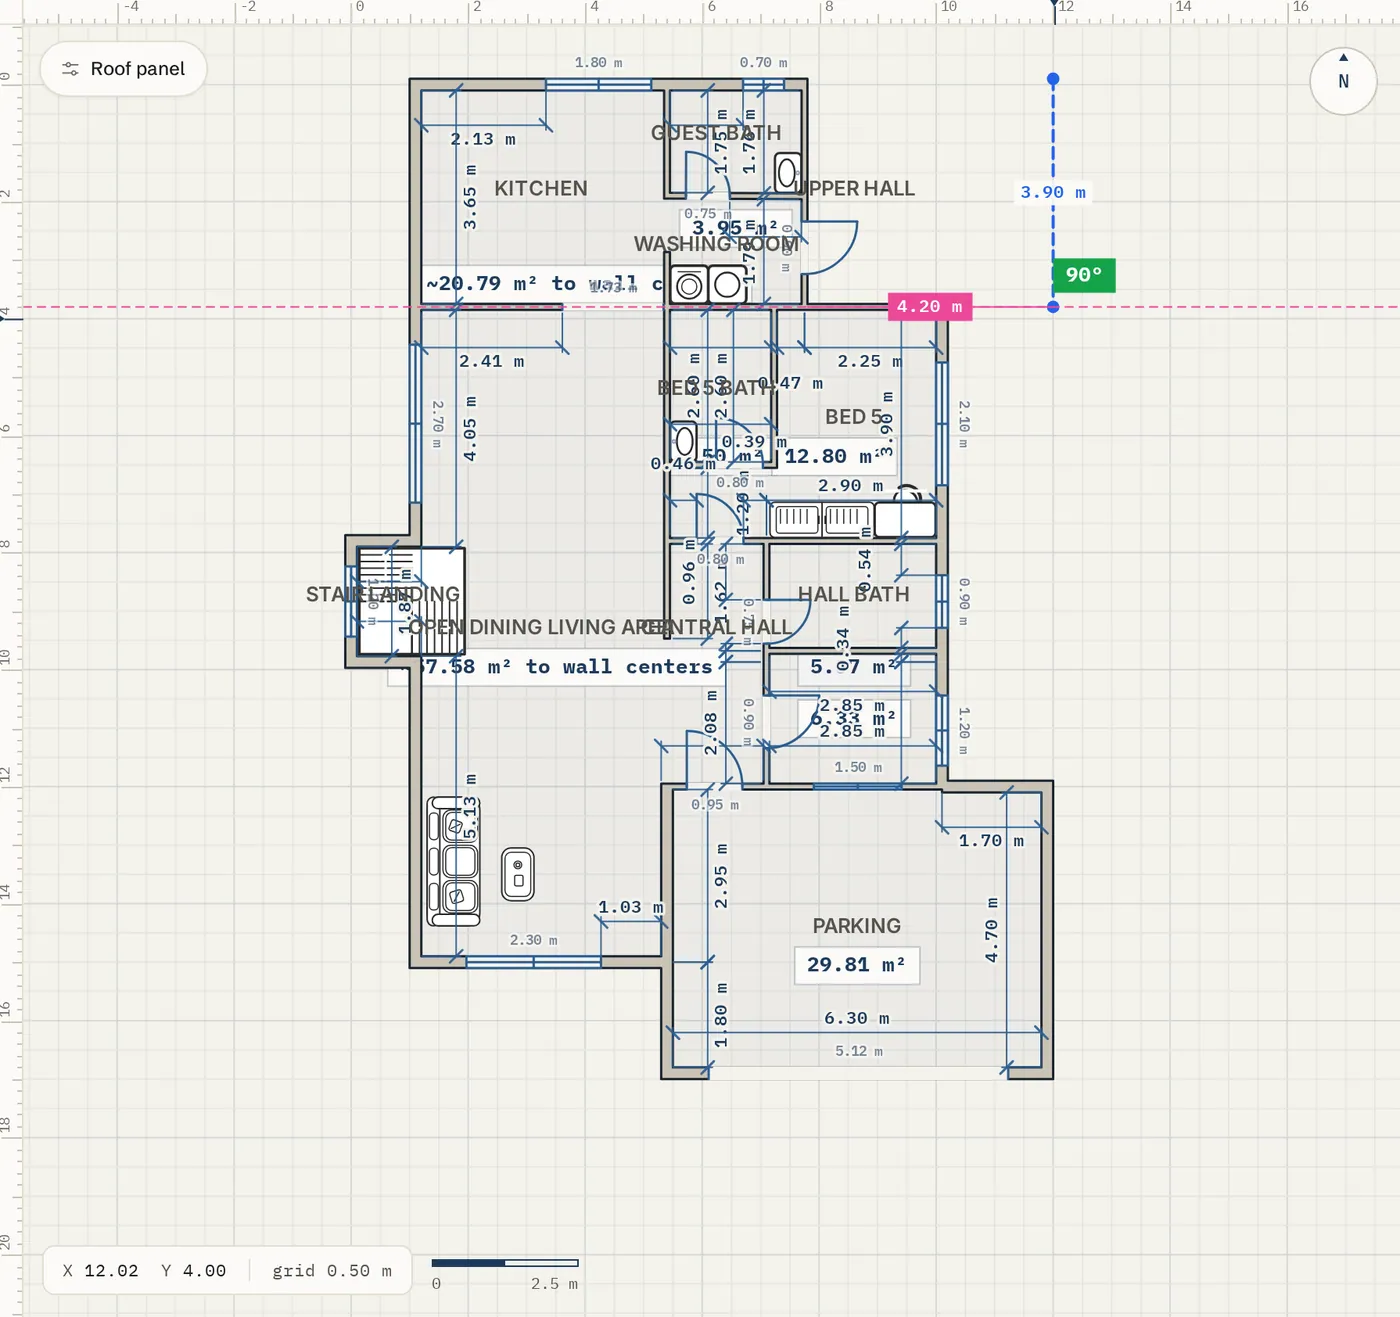
Click the corners of the roof one by one. Corners snap to the outer wall corners and outer wall faces, shown by the badges Outer corner and Outer face. Pink guides line a corner up with other corners.
Use Shift and Alt
Hold Shift to lock the edge to 45 degree steps. Hold Alt to place a corner freely, without snapping.
Close the outline
Click the first corner again to close the shape. A roof needs at least three corners. The panel comes back with the new roof selected.
Choose the style, pitch and overhang
Pick a type
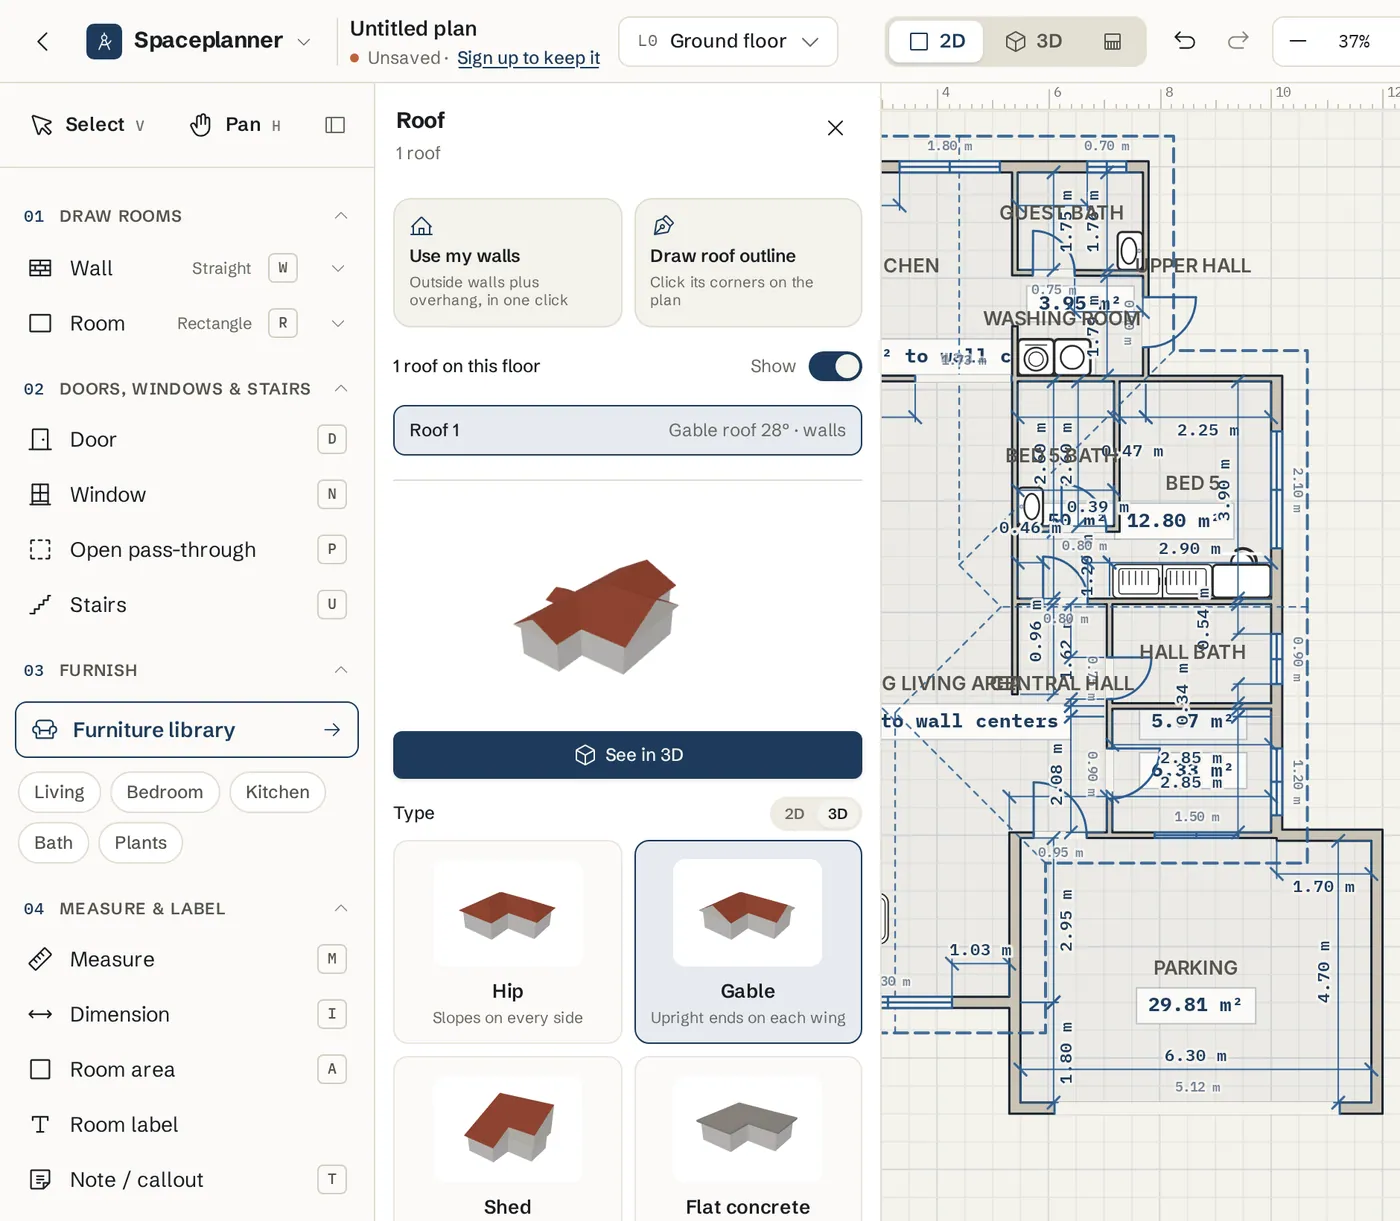
Under Type, choose Hip (slopes on every side), Gable (upright ends on each wing), Shed (one slope), Flat concrete, Timber deck, Metal sheet or Pergola (open timber slats).
Set the pitch
For a pitched roof, drag Pitch (5 to 55 degrees).
Set the overhang
Drag Eaves overhang (0 to 120 cm). A new pitched roof starts at 45 cm. A new flat roof starts flush with the walls at 0.
Set the eave height
Eave height is where the roof starts, measured from this floor. Auto sits it on top of the walls. Type a height to raise or lower just that roof, and click Use auto to go back. The floor and the walls never move.
Add a porch roof
Draw the porch outline against the house wall and give it a lower Eave height. The edge against the taller wall gets no overhang, the wall stays solid above it, a Shed rises toward the wall and a Gable puts its gable end on the wall.
Add a chimney
Open the furniture library, pick Chimney under Structure (or search "chimney"), and place it. Set its width, depth, Height and Elevation off floor in the panel, and a brick or stone Finish. A chimney standing inside a roof face cuts a clean hole through it.
Set the ridge direction
On a gable roof, Ridge runs can be Auto, Left-right or Up-down. On a shed roof it sets where the high side runs, and on a pergola which way the slats run. A hip roof follows the outline, and a flat roof has no ridge.
Set thickness and colour
A flat roof has a Slab thickness. Pitched roofs have a Tile colour, other roofs a Colour.
See it in 3D
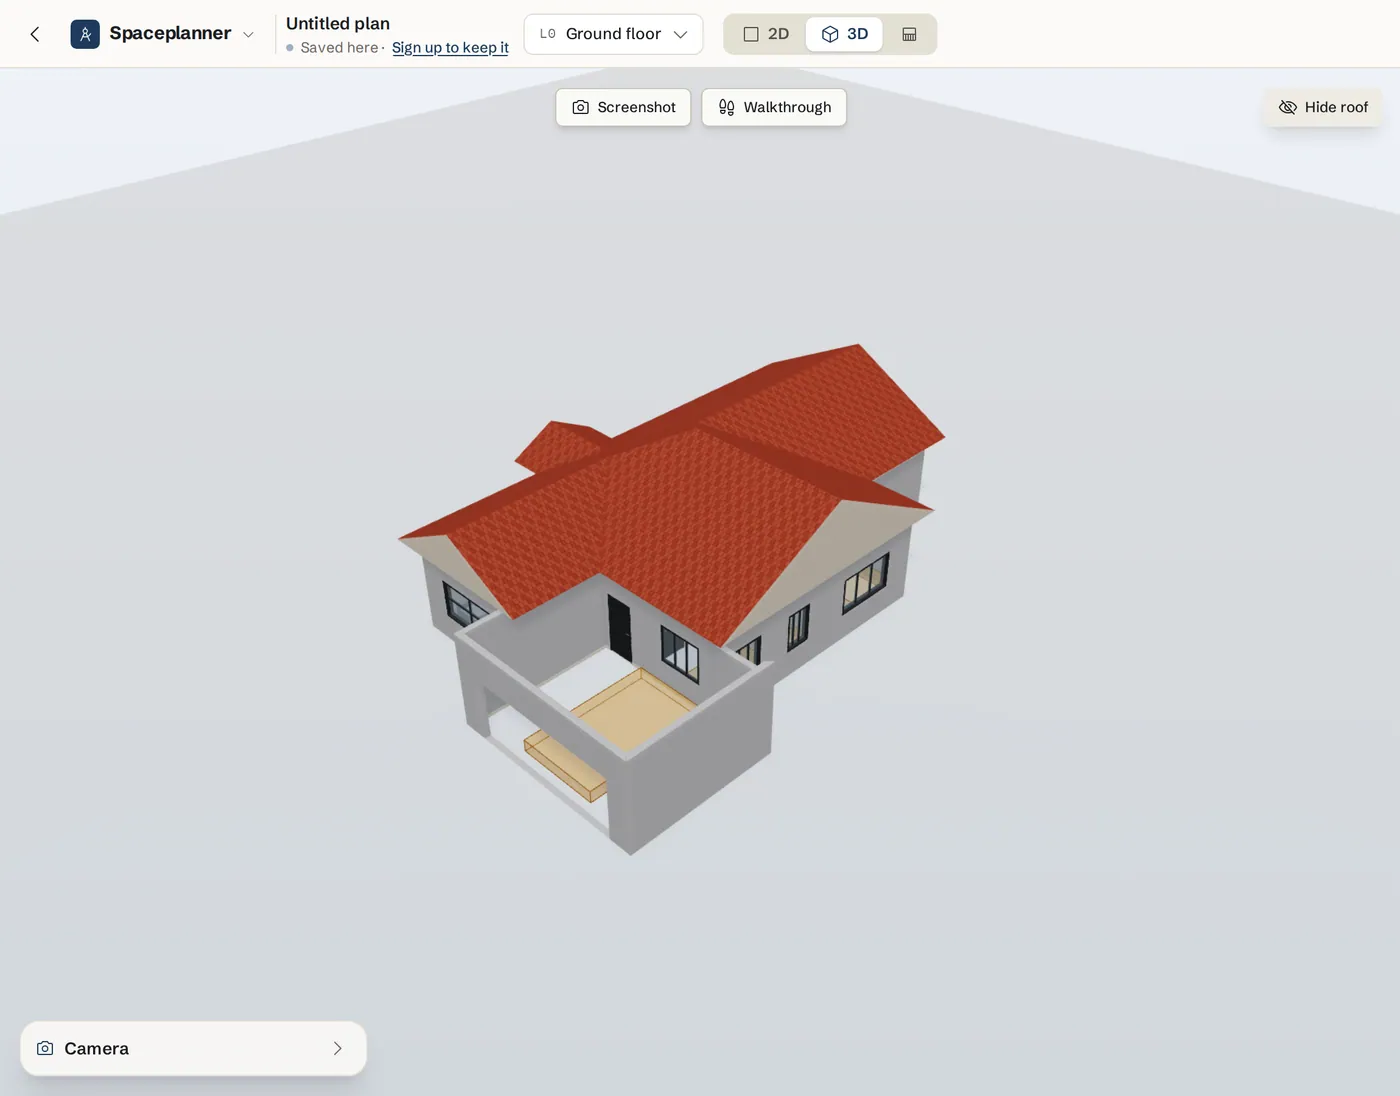
Click See in 3D. Switch Roof off in the 3D toolbar at the bottom to look inside, and on again to bring it back.
Reshape or delete a roof
Select the roof
With the Roof panel open, click the roof in its list, or click the roof outline or overhang on the plan. You can also click it in 3D.
Drag, add or remove corners
Drag a corner on the plan to reshape a drawn roof. Alt-click an edge to add a corner. Alt-click a corner to remove it.
Delete it
Click Delete this roof, or press Delete with the roof selected.
Tips
- For a house with a lower wing, draw the main roof on the top floor and the lower roof on the floor it covers. Its corners snap to the upper floor's facade, so it butts neatly against it.
- The Show switch in the Roof panel hides or shows all roofs of that floor. The Roof layer in Layers controls the dashed outline on the plan.
- Roofs appear in building elevations and in exports. Untick Roof outline in the export dialog to leave the outline off a plan sheet.
- Clicking elsewhere on the plan closes the Roof panel.
- Add a floor above the top floor with Copy outer walls from this floor, or Duplicate the top floor, and the roof moves up to the new top floor. A message says so, with Undo. An Empty floor above keeps the roof where it is and offers Move up, so you can move it once the new floor has walls.
Common problems
- Flat or Pitched does nothing, or the button is greyed out
- Your outside walls do not close a shape yet. Look for a gap at a corner and close it, or use Draw outline.
- The roof shows through the floor above in 3D
- The roof sits on a lower floor, for example after you added an empty floor above. Use Move up if it is offered, or delete it, switch to the top floor and add it there. Keep lower roofs only for parts the floor above does not cover, like a porch.
- The roof is flat even though I picked a pitched type
- Some outlines cannot carry a pitched roof, so the roof is drawn flat, as in 3D. Simplify the outline or split it into two roofs.
- The outline does not close
- Click exactly on the first corner. Press Esc to cancel and start again.
Related topics
- Floors & levelsAdd floors and basements, switch between them, and make each storey line up with the one below.
- WallsDraw straight walls corner to corner, type exact lengths, and set thickness, height and corner join.
- 3D view & walkthroughSee the same plan in live 3D, light it, look inside, save views, walk through it and turn a view into a realistic photo.
- ElevationsSee every side of the building face on, move doors and windows on the facade, and print elevation sheets.
- Export & print (PDF)Download plans and elevations as PDF, PNG, SVG or a 3D model, true to scale on A4 to A0 paper, or save the whole plan as a SpacePlanner plan file.
Planning a whole project?
Try it on a real plan
Free, in your browser. No sign-up needed to start.