Views
How to use the Elevation workspace
An elevation is a flat drawing of the building seen straight on from one side. SpacePlanner draws them for you from the plan: every floor, the roof and every door and window.
Use the Views workspace to check how the house looks from outside, to line up windows between floors, and to set sill and head heights by dragging instead of typing. It also holds your sections: slices through the house that show every floor from the ground to the roof.
Plans are drawn north-up, so the South elevation is the front of the house, North is the back, West is the left and East is the right.
Open the elevation grid
Switch to Views
In the top bar, the workspace switch has three buttons: 2D, 3D and Views. Click Views. On a narrow screen it shows as an icon only.
Read the four facades
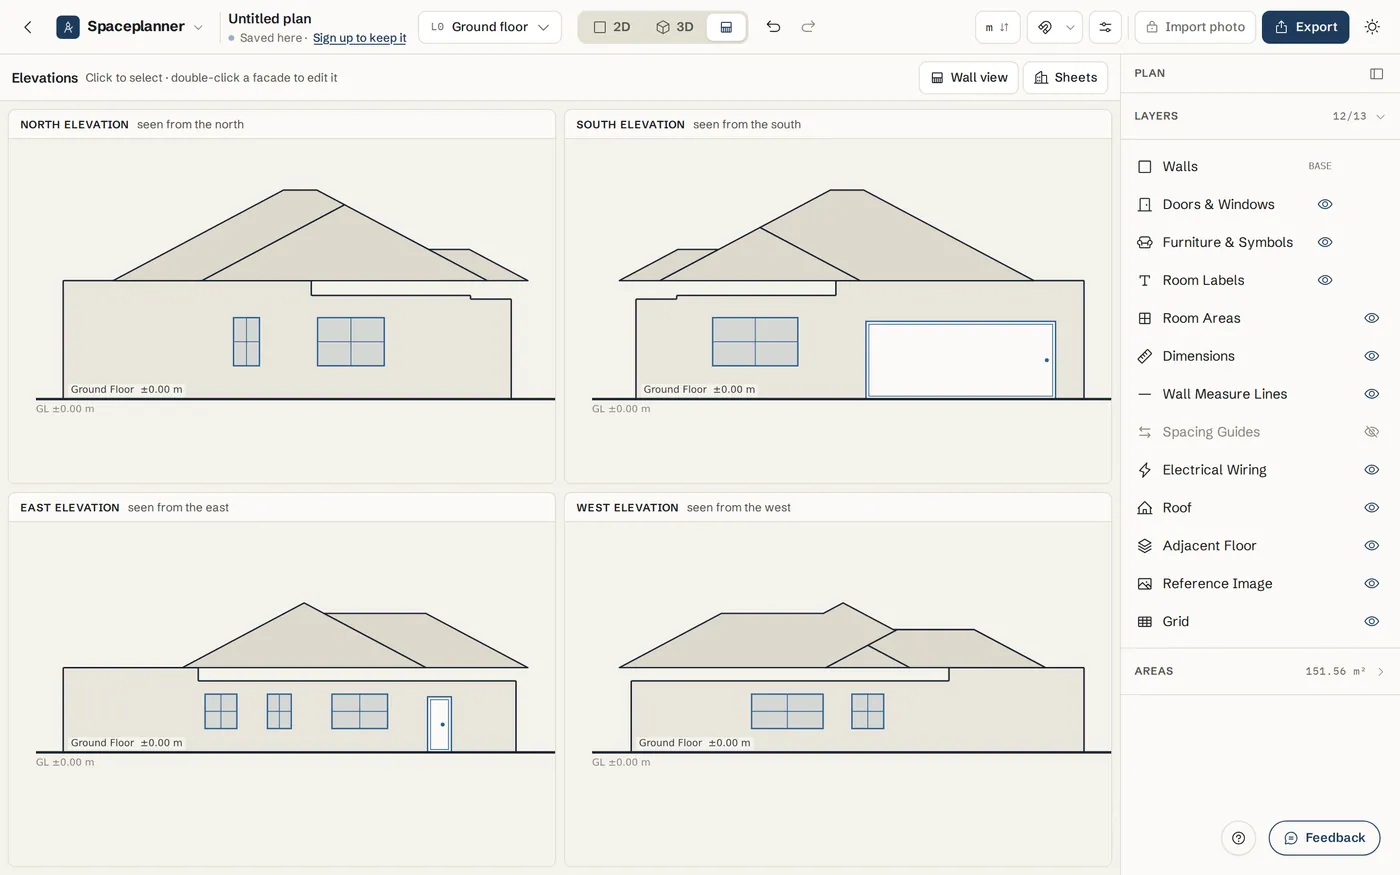
The Elevations grid shows the four sides at once: South (Front), North (Back), West (Left) and East (Right). Each shows the whole building with every floor level and the roof. Click one to select it.
Open a facade to edit it
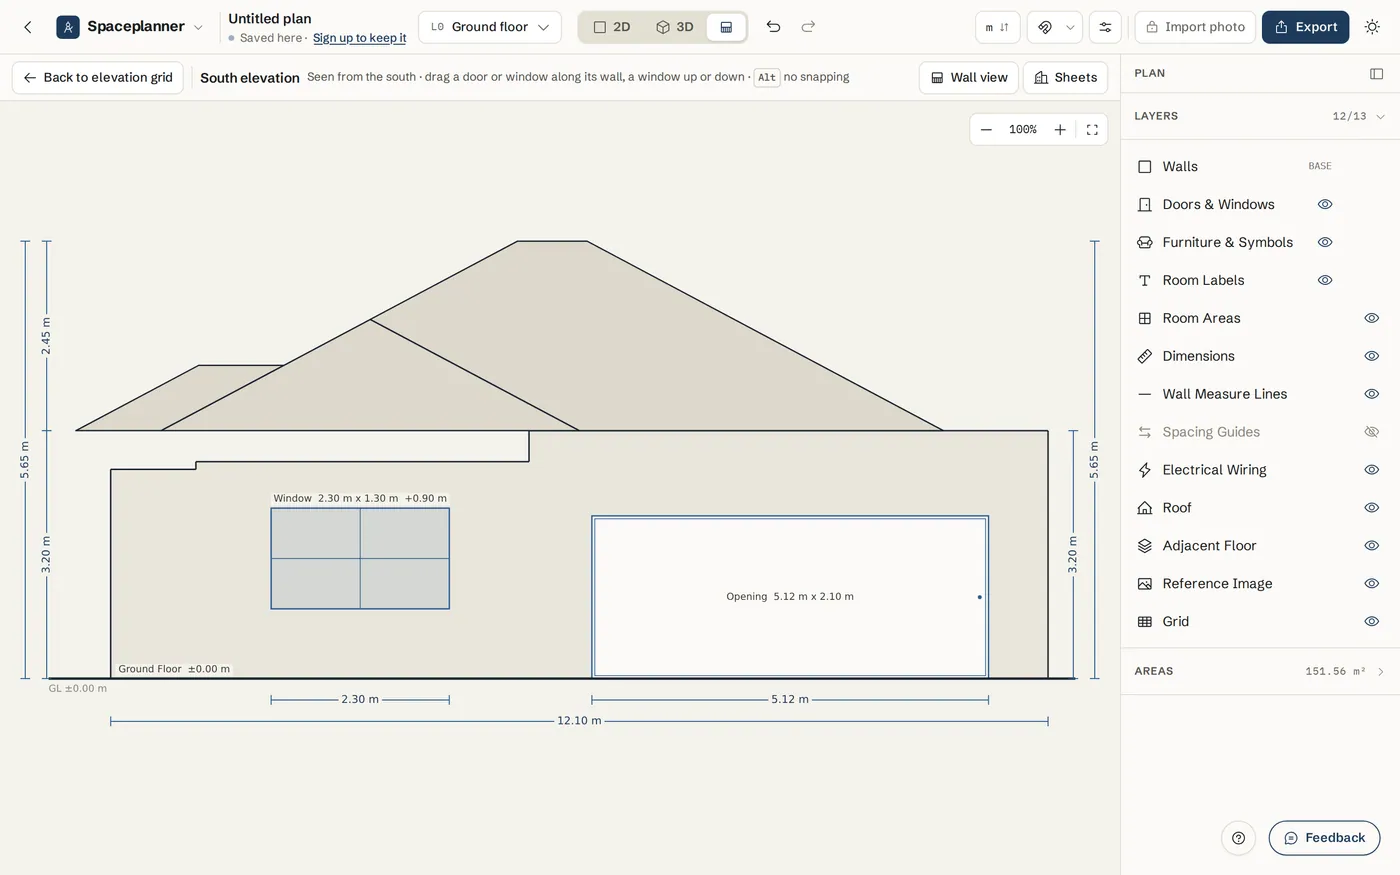
Double-click a facade. It opens full size, with the side and compass direction in the header.
Move doors and windows on a facade
Drag an opening along its wall
Drag a door or window left or right to slide it along its wall. The plan updates at the same time, because both views edit the same document.
Drag a window up or down
Drag a window up or down to change its height on the wall. The readout shows its sill and head height while you drag.
Use the guides
While you drag, the opening snaps to guides: Sill, Head, Center, Left edge, Right edge, Wall centre, Equal gaps and Wall end. Live dimensions show the clearance to its neighbours.
Place freely
Hold Alt while dragging to turn snapping off.
Go back to the grid
Click Back to elevation grid, or press Esc.
Draw a section through the house
A section shows a slice through your home: walls, floors, stairs and the roof that the line cuts, and everything you would see behind it. It is drawn from your plan and updates by itself.
Draw the section line
On the 2D plan, pick Section line under Measure & label (or press Shift+K, or right-click and choose Create section here). Click where the line starts, click where it ends, then move the mouse to the side you want to look at and click. On a phone, tap twice: it looks at the side with more of the house, and Flip view turns it around.
Adjust it on the plan
Drag the line to move it, or drag an end badge to change its length or angle. Use Flip view (or F) to look the other way, and double-click a badge to rename it. While it is selected, a live preview in the corner shows the section.
Open the section
Double-click the line, click Open on its toolbar, or double-click its card under Sections in Views. The corner map shows where it cuts. Turn Furniture, Room names, Level heights, Dimensions and Things behind the cut on or off in the right panel, and Show on plan takes you back to the line.
Print it
In Export, sections are listed under Sections in Drawings to export. The tick is the same as Include in export on the section; a section that is left out shows a crossed-out printer on its card.
Look at one wall face on
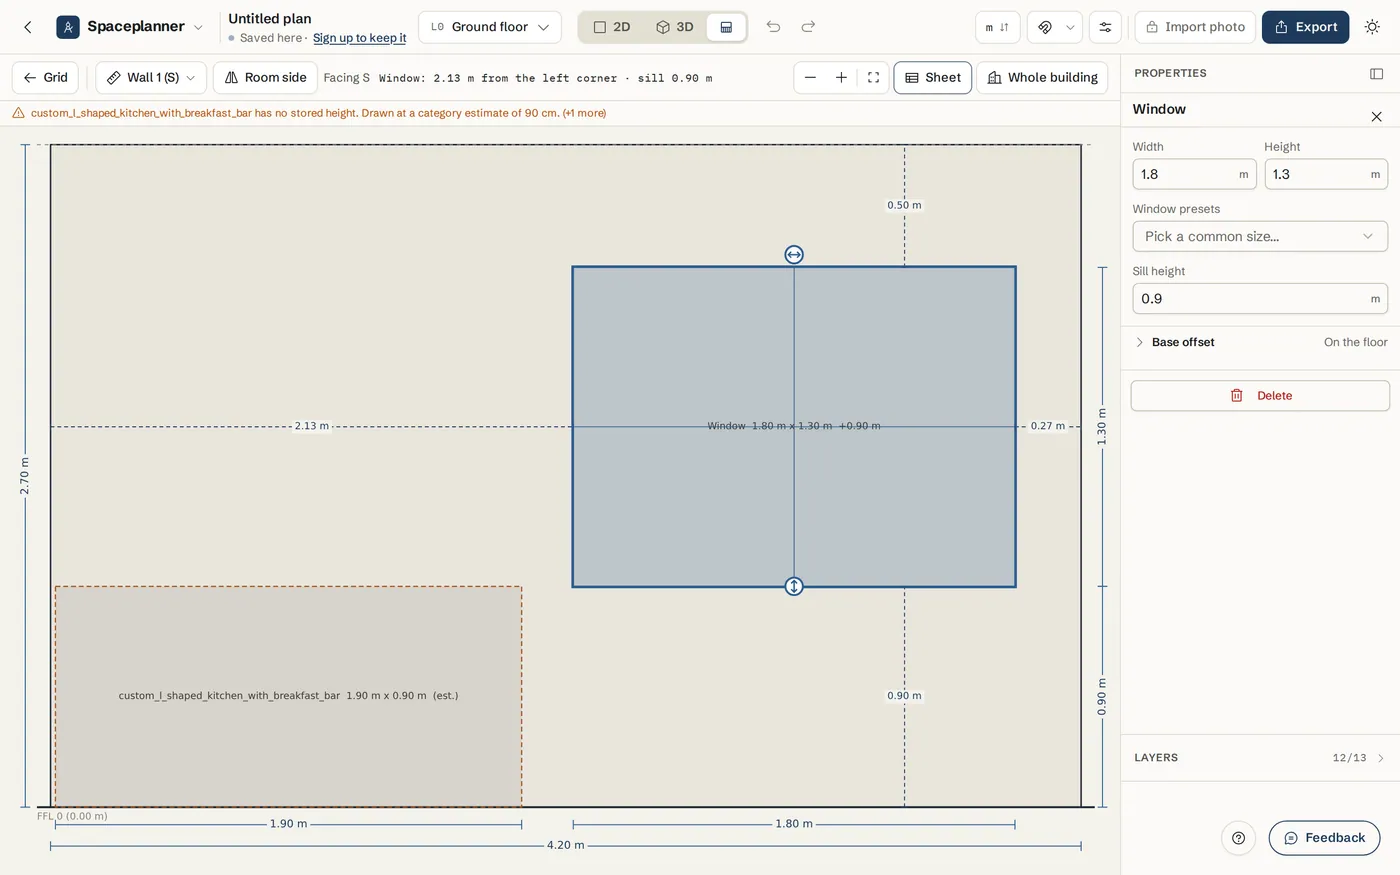
Wall view shows a single wall, from either side, including the room side. It is the best view for kitchens, bathrooms and anything that stands against one wall.
Open Wall view
In the Elevation workspace, click Wall view. Pick the wall in Wall to edit. If you select a wall or a door on the 2D plan first, Wall view opens on that wall directly.
Look at the other face
Use the flip button to see the other side of the same wall. The header says which way you are facing.
Move openings on the wall
Drag a door or window along the wall, or a window up and down. Hold Shift to move freely, or Alt for 1 cm steps. Use Fit wall to view if you lose it.
Open the wall sheet
Click Sheet for the section, the schedule and a PNG of this wall. Choose Front (elevation) for the wall face on or Side (section) to see how far things project. Schedule lists everything standing against the wall.
Print elevation sheets
Open Sheets
Click Sheets in the Elevation workspace. The Building elevations view shows one side of the building at a time, drawn to scale with heights from ground level.
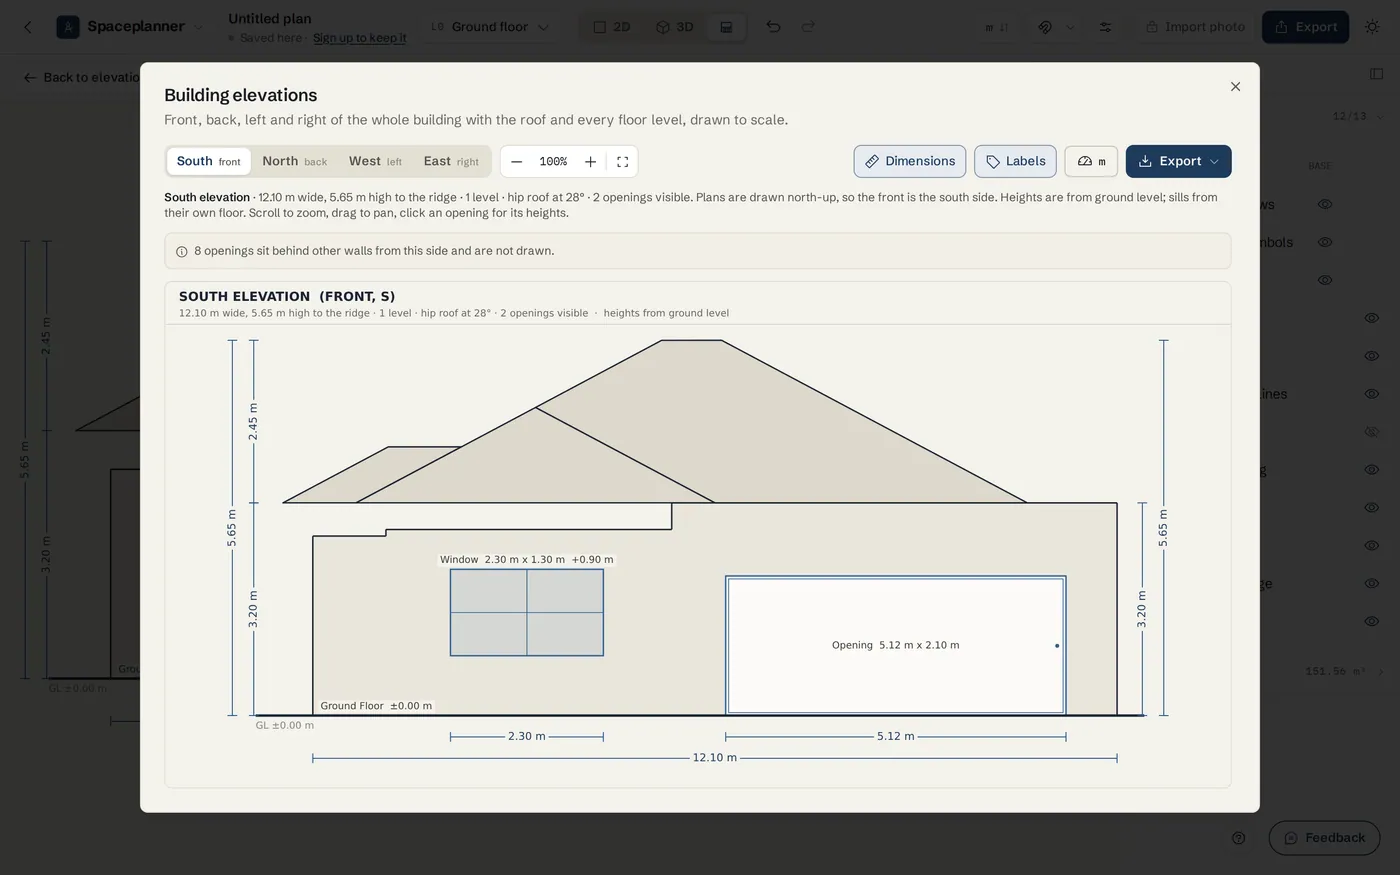
Pick the side and the labels
Pick the Side of the building. Toggle Dimensions for widths and heights and Labels for the name and size on each opening. Click an opening to see its sill, height and head.
Download
Under This side, pick PNG image or PDF sheet. Under All four sides, pick PDF, one sheet per side. To put elevations and plans together on one sheet, use Export in the top bar instead.
Tips
- Heights on elevation sheets are from ground level (GL). Floor levels show as FFL marks, and sills are measured from their own floor.
- Elevations follow the roof. With no roof set up, wall tops are drawn flat; add a roof and it appears in every elevation.
- Use the facade view to line up windows on the ground floor with the ones on the floor above.
- A window that reaches above its wall or runs past the end of the wall is flagged in a warning under the drawing.
- Every change you make in elevation is a normal edit: Ctrl+Z undoes it.
- A section always cuts every floor at once, so one line through the stairs shows the whole house from the ground to the roof.
Common problems
- The elevation is empty
- Elevations need walls. Draw walls on at least one floor, then the building appears from each side.
- I cannot drag an opening on a curved wall
- Curved walls are drawn flattened onto their chord in elevation, so they cannot be edited there yet. Move those openings on the 2D plan.
- An opening cannot be edited from this side
- It may be on another floor (switch to that floor), or on a wall seen at a sharp angle. Use the facade the wall faces, or Wall view.
- Some windows are missing
- Openings that sit behind other walls from that side are not drawn. The warning under the drawing says how many.
- The walls are all the same height
- Walls with no height set are drawn at the default height. Select a wall on the plan and set its Clear height.
- The front of my house shows as the back
- Plans are north-up, so the side at the bottom of the plan is the South, front, elevation. Draw the plan with the street side at the bottom.
Related topics
- Export & print (PDF)Download plans and elevations as PDF, PNG, SVG or a 3D model, true to scale on A4 to A0 paper, or save the whole plan as a SpacePlanner plan file.
- Doors & windowsPlace doors and windows on walls, then set the style, size, swing, hinge and sill height.
- RoofsStart a flat or pitched roof from your walls, or trace its outline, then pick the style, pitch and overhang.
- Floors & levelsAdd floors and basements, switch between them, and make each storey line up with the one below.
- 3D view & walkthroughSee the same plan in live 3D, light it, look inside, save views, walk through it and turn a view into a realistic photo.
Try it on a real plan
Free, in your browser. No sign-up needed to start.