Building features
How to add stairs, design them and connect floors
Stairs take you from one floor to the next. You pick a style, place it on the plan, then shape it in the Stair configurator with a live 3D preview.
Connect a stair to the floor above or below and the 3D view shows one continuous stairwell. For a small step between two floor heights on the same level, such as a sunken living room, use connecting steps instead.
Place a stair
Open Stair Styles
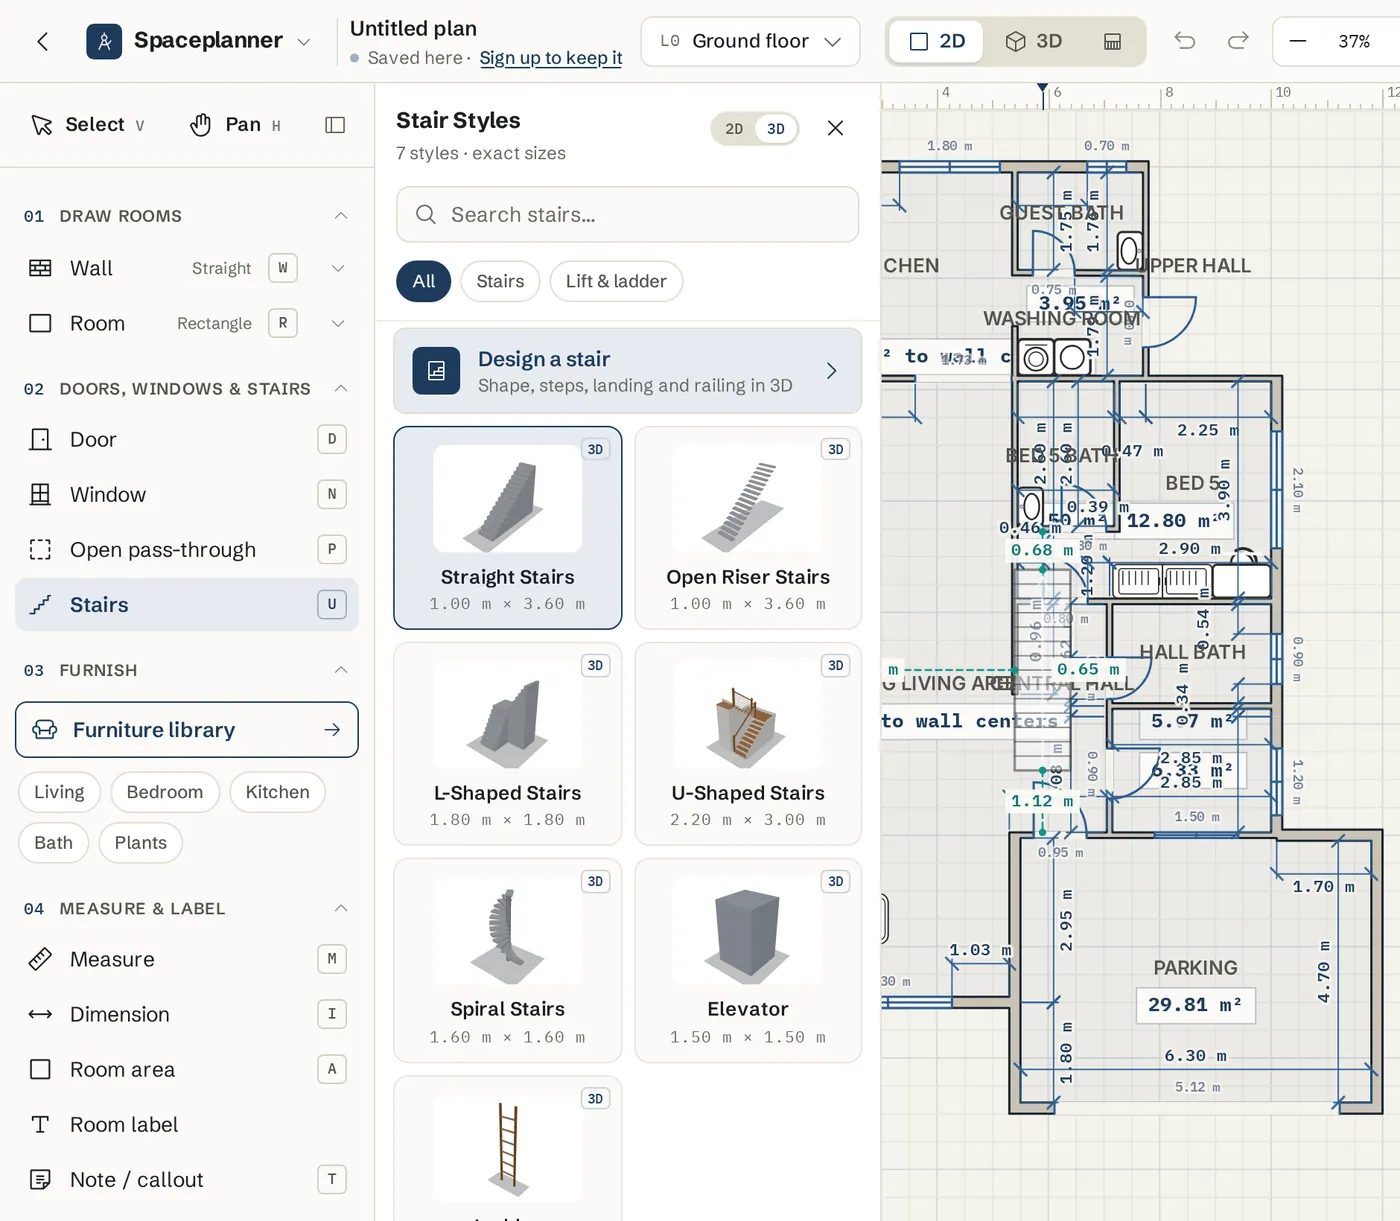
Press U, or click Stairs in the left toolbar under Openings & circulation. The Stair Styles gallery opens.
Pick a style
Choose Straight Stairs, Open Riser Stairs, L-Shaped Stairs, U-Shaped Stairs or Spiral Stairs. The Lift & ladder tab has an Elevator and a Ladder for access without steps. You can also search, for example "spiral".
Click the plan to place it
Click where the stair should go. It is placed at a standard size and selected, ready to adjust. Drag it to move it. To turn it, use Rotate 90° in the quick actions beside it, or the rotation presets in its panel.
Answer the level question
On a plan with one floor, a new stair asks Stairs lead somewhere - add another level? Choose Upper floor or Basement to create and connect that level now, or Not now to do it later. With more floors, the stair connects at once: from the floor you are on to the next floor up (on the top floor, the next one down). You can change both levels under Stair connects.
Design the stair in the Stair configurator
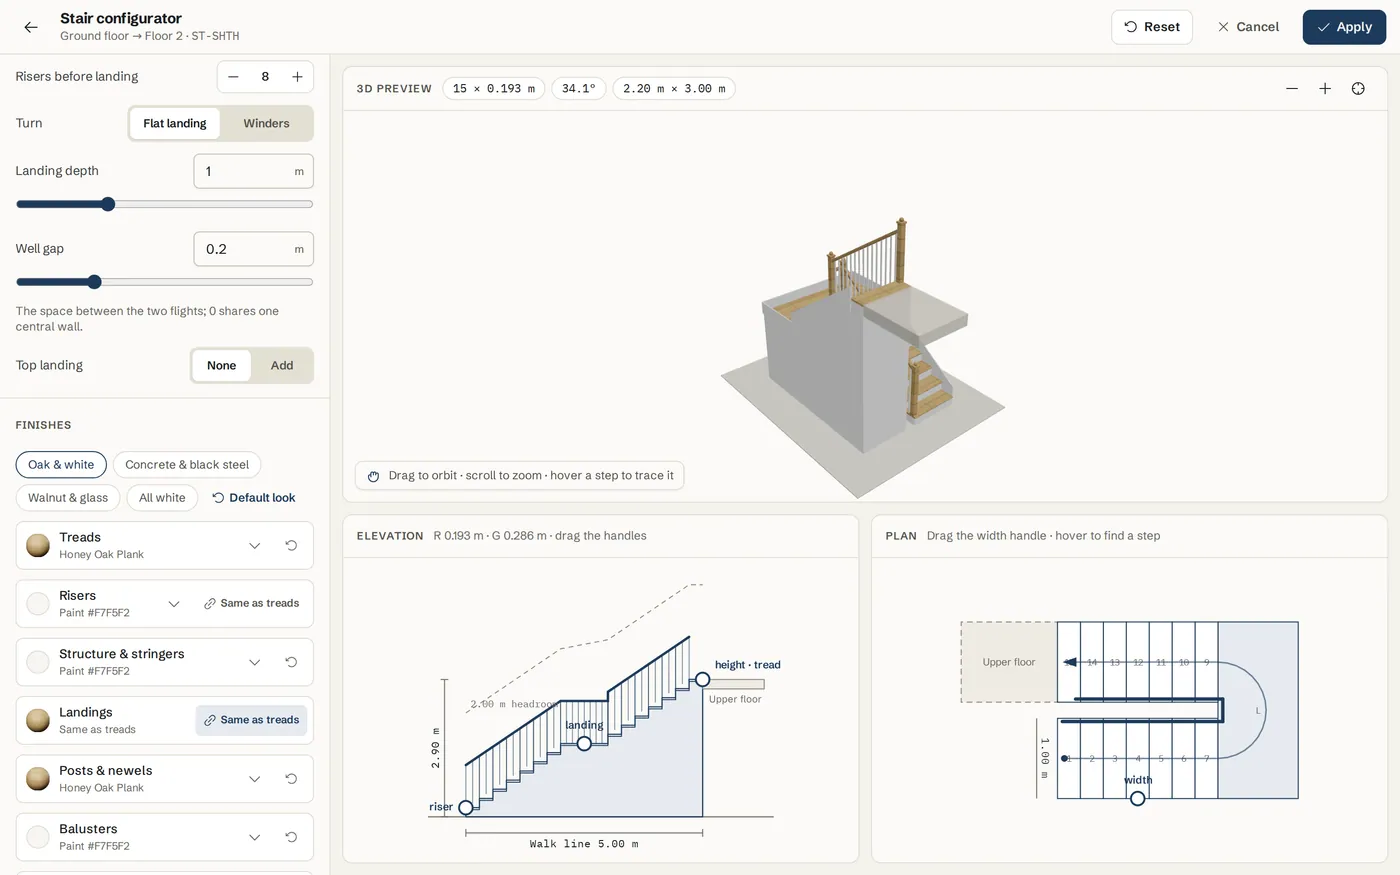
The configurator edits a draft. Nothing changes on the plan until you click Apply.
Open the configurator
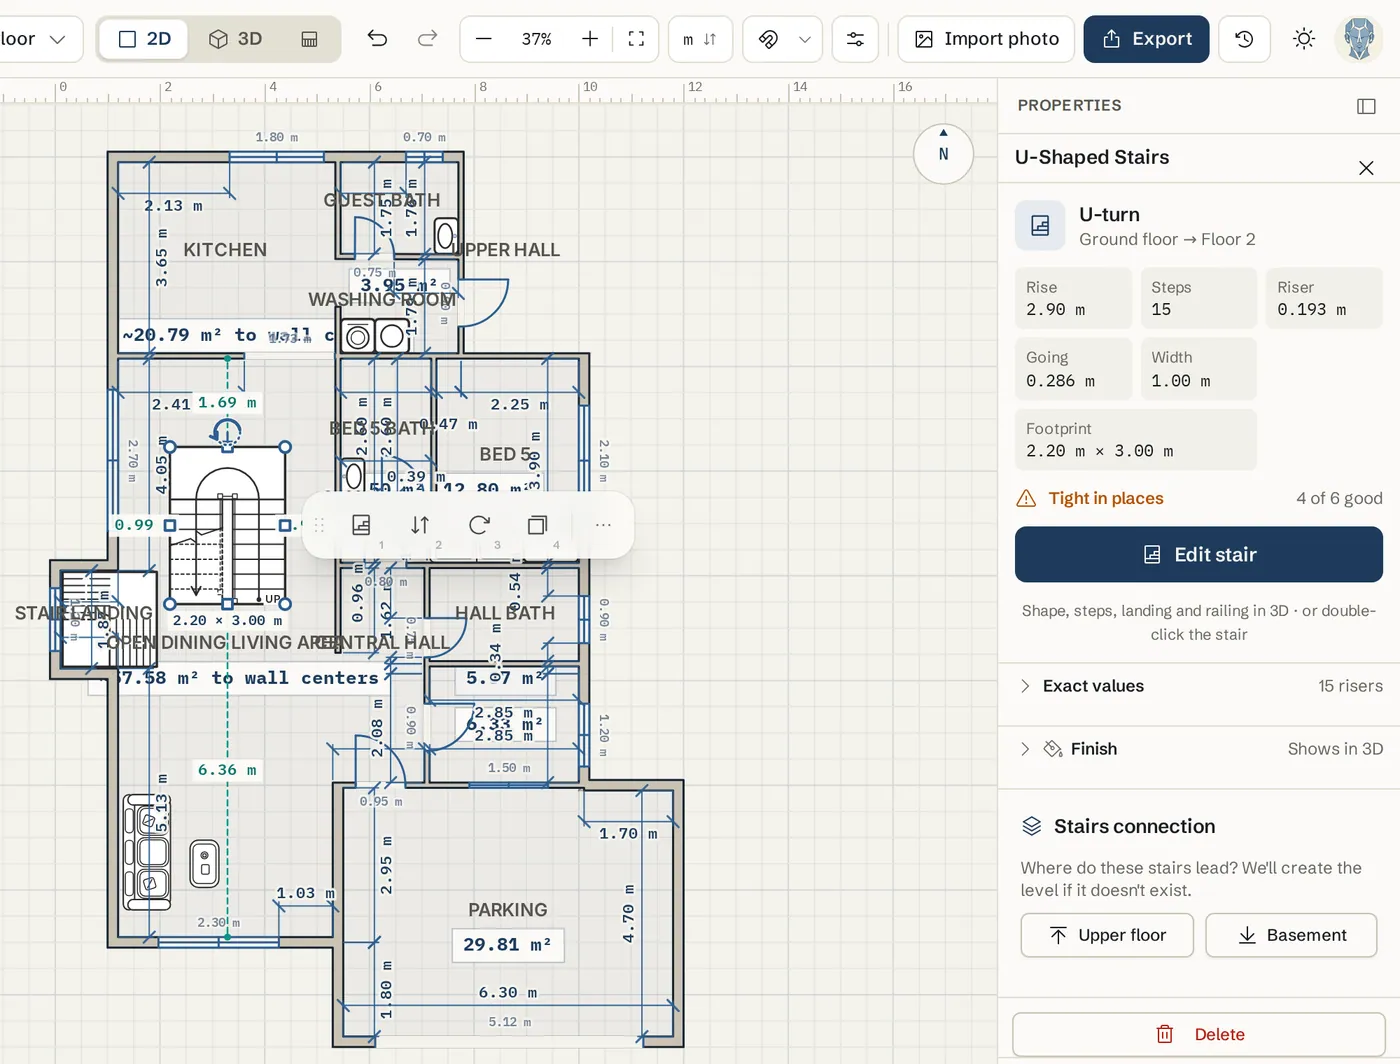
Select the stair. In the right panel, click Edit stair on the summary card, or double-click the stair on the plan. To design a new one first, click Design a stair at the top of Stair Styles.
Choose the shape
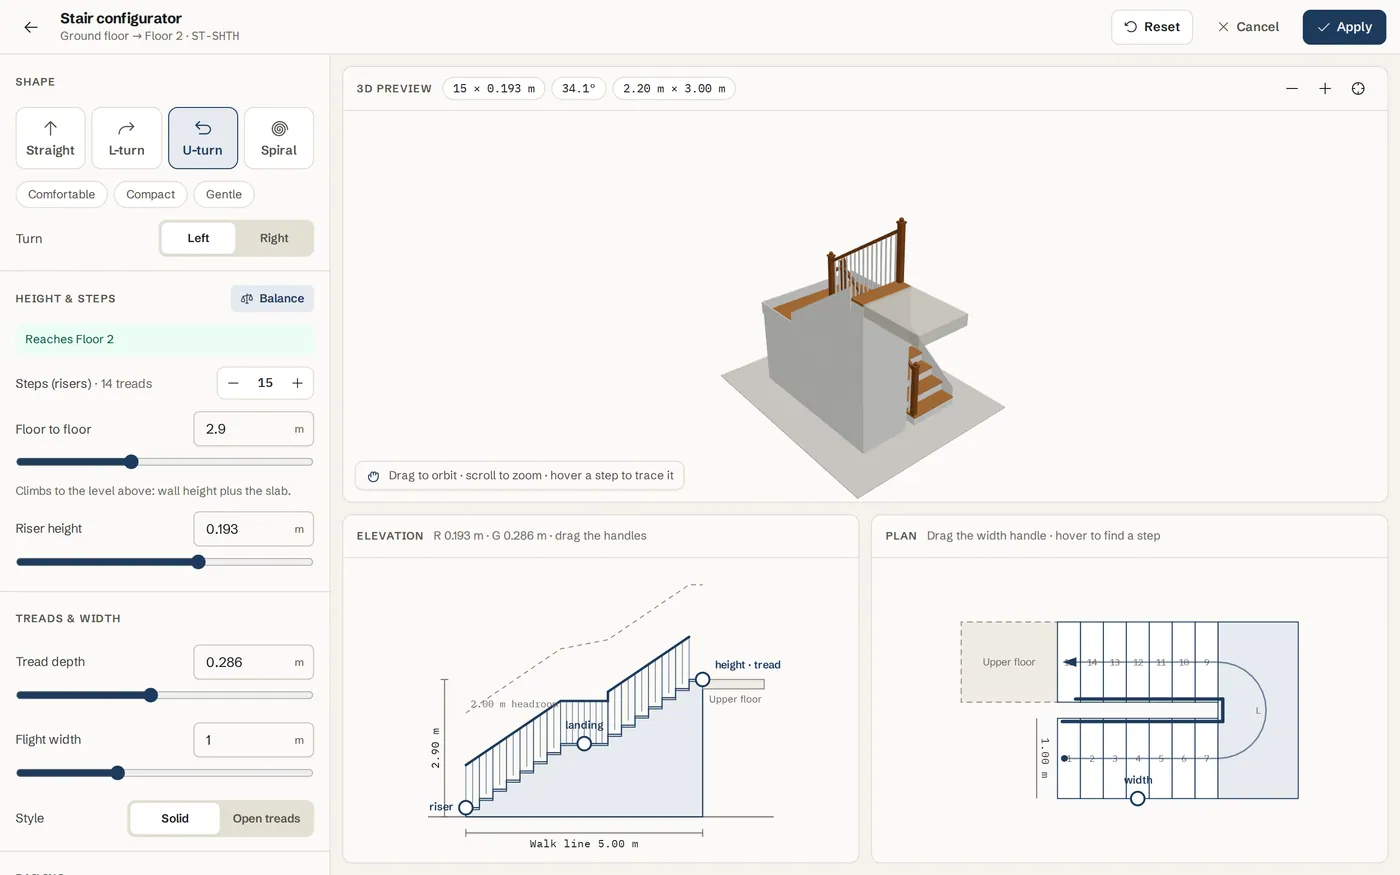
Under Shape, pick Straight, L-turn, L winders, U-turn or Spiral. L winders is an L-shaped stair that turns the corner on tapered winder treads instead of a flat landing; set how many (2 to 4) with Winder treads under Landing. Set the turn to Left or Right, or Clockwise / Anticlockwise for a spiral. Presets Comfortable, Compact and Gentle set good step sizes in one click.
Set the height and steps
At the top, Stair connects shows the From level and the To level with their names and elevations, for example Office +1.20 m and Basement −1.20 m, and the Total height between them (2.40 m). The total height comes from the two levels only, so it is read only. Under Height & steps, change Steps (risers) with the minus and plus buttons, or click Balance for comfortable 17.5 cm risers. On a single floor plan the rise climbs the level height; if it says it is short of or above the floor, click Fit.
Set treads and width
Under Treads & width, set Tread depth and Stair width (Diameter for a spiral). Style switches between Solid and Open treads.
Add a railing
Under Railing, pick the sides. A straight stair offers None, Left, Right and Both. L and U stairs offer Inner, which follows the turn, and Outer, which wraps the landing. Then pick Balusters, Glass, Cable or Handrail and the Rail height.
Shape the landing
On L and U stairs, Landing sets Risers before landing (or Split evenly), Flat landing or Winders, Landing depth, and on a U stair the Well gap between the two flights. Top landing adds a flat landing at the top.
Drag the handles
In the Elevation view, drag the top handle to change height and tread depth, the first riser to change riser height, and the landing along the flight. In the Plan view, drag the width handle. Hover a step to see its number and height in all three views.
Check Comfort & code
Comfort & code grades riser height, tread depth, the stride 2R + G, pitch, clear width and handrail as Good, Tight or Fails. These are guide values from common home building codes. Check your local rules.
Apply or cancel
Click Apply (or Add to plan for a new stair) to put it on the plan as one undo step. Cancel or Esc throws the draft away.
Use the space under the stairs
A stair can be solid down to the floor or open underneath, so a WC, storage or a cupboard fits below it and shows in 3D.
Pick what is under the stairs
In the configurator, or in the stair's panel, find Under the stairs. Solid fills the stair down to the floor. Open leaves the space below the flights and the landing free: each flight rests on a sloped waist and the landing on its slab. Posts is open with slim posts under the landing corners, for a stair that does not rest on walls. New U stairs start Open. Spiral stairs keep their centre column.
Place furniture under it
Add a toilet, a basin, shelves or walls and a door where the stair is. On the plan they are drawn over an open stair, and its outline is dashed on top, the usual way to show the part of a stair above you. Click an item under the stair to select it. In 3D it stands under the flight.
Give each part a finish
Open Finishes
In the configurator, open Finishes. Each part has its own row: Treads, Risers, Structure & stringers, Landings, Posts & newels, Balusters, Infill panels, Handrail, and Centre column on a spiral.
Start from a preset
Click Oak & white, Concrete & black steel, Walnut & glass or All white. Default look puts the original look back.
Change one part
Open a part and pick from Materials (wood, stone, tile, concrete and our textures, plus Black steel, Brushed steel, Brass and White powder coat) or Paint. Glass infill has a tint and an Opacity slider. Risers and landings can stay Same as treads. You can also click a part in any view to open its finish.
Connect a stair to another floor
Pick the From and To levels
Select the stair on the 2D plan. The Stair connects card above its properties (and the same section at the top of the configurator) has a From level and a To level. Pick any two of your floors: the next floor up, a basement, a mezzanine, or two floors apart. The stair does not have to go to the floor right above.
Go up or down
A stair can start on the upper floor and go down, for example Office +1.20 m to Basement −1.20 m. It is the same flight as Basement to Office; the swap button between the two lists reverses the direction. The Total height is the difference of the two elevations.
Move a level, the stair follows
The stair stores the two levels, not a height. Change a level elevation later (Office +1.20 to +1.40) and the stair, its risers and its stairwell update on their own, in 2D, 3D, elevations and exports.
Single floor plans
With only one floor, the card offers Upper floor or Basement and creates that level for you. Open a connected floor with the Open button on the card.
Tips
- A connected stair starts exactly on the top of the lower floor and ends on the top of the higher one, and 3D opens the slab of every floor it passes through.
- The project datum (±0.00, drawn as GL in elevations) is only a reference height. It is not a floor: a stair never connects to it unless one of your floors sits there.
- On a single floor plan, a stair with no typed floor to floor height climbs the full level height: the wall height plus the slab. So its top lands where a floor above would be.
- Typing Base elevation or Floor-to-floor by hand in Exact values switches the stair to Heights set by hand. Click Match floors to go back to automatic.
- On an L stair the corner landing is reached by the last riser of the lower flight, so the lower flight has one tread fewer than risers.
- A U stair gets a handrail on the open well side by default. Straight and L stairs have none until you pick sides.
- Stairs follow raised and sunken floors. A stair standing on a floor area at -40 cm starts at -40 cm and still reaches the floor above.
- For a step down into a sunken room, select the sunken floor and click Add steps. See the Sunken rooms guide.
- Stairs are also in the furniture library under Stairs & Access, so searching the library finds them too.
Common problems
- The stair does not reach the floor above
- Open the configurator and check Stair connects: the To level is where it ends. If you typed a height in Exact values, the card says Custom height; click Use levels (or Match floors) to let it follow the floors again.
- The stairs are not connected in 3D
- Select the stair in 2D and check From level and To level on the Stair connects card. Also check the stair sits under open space on the floor above.
- I need a stair from an upper floor down to a basement
- Place the stair on the upper floor, open Stair connects and set To level to the basement. The total height is the difference of the two elevations, for example +1.20 m to −1.20 m = 2.40 m. A floor in between is skipped; its slab is opened where the stair passes.
- Stair connects says the stair does not fit
- The total height needs more or taller risers than the stair has room for. Add risers, make the treads deeper or the run longer, or choose an L or U shape. Over 8.40 m (40 risers of 21 cm) one flight cannot do it: add a floor in between and a second stair.
- I cannot connect stairs as a guest
- Multi level plans need a free account so each floor can be saved. Click Sign up to add levels on the Stairs connection card.
- Comfort & code says Fails
- Usually the risers are too tall or the treads too short for the space. Try the Comfortable preset or Balance, add steps, or make the run longer.
- My changes in the configurator disappeared
- The configurator is a draft. Click Apply before you leave. Esc and Cancel discard the draft.
Related topics
- Floors & levelsAdd floors and basements, switch between them, and make each storey line up with the one below.
- Sunken and raised floorsSet a floor area higher or lower than the rest of the level, then add steps that fit the height difference.
- Finishes and materialsOne finish picker for floors, walls, stairs and furniture: pick a material or paint, then adjust scale, grain and tint.
- 3D view & walkthroughSee the same plan in live 3D, light it, look inside, save views, walk through it and turn a view into a realistic photo.
- Slabs and balconiesDraw balconies and terraces, give them railings (automatic or drawn), and manage the automatic floor slab of each level.
Planning a whole project?
Try it on a real plan
Free, in your browser. No sign-up needed to start.