Building features
How to add a balcony, terrace or custom slab
Every level stands on a concrete floor slab. SpacePlanner builds it for you from the rooms you draw, out to the outside face of the walls, plus any balconies, so the floor above never floats in the air. On an upper floor that slab is also the ceiling of the level below.
Outside the walls you draw with the Balcony & terrace tool. On an upper floor the shape becomes a balcony: a slab at that floor, as thick as the level's slab, with a railing on its open edges. On the ground floor it becomes a terrace: a deck at ground level that you can raise into a platform. Railings can also be drawn on their own with the Railing tool.
Draw a balcony or terrace
Arm the Balcony & terrace tool
Press S, or click Balcony & terrace in the left toolbar under Structure. A hint at the bottom says: click to draw the outline of a balcony or terrace, close the shape to finish. In 3D, the floor menu (the plan name at the top left) has a Draw a balcony or terrace button that takes you to the 2D plan.
Click each corner
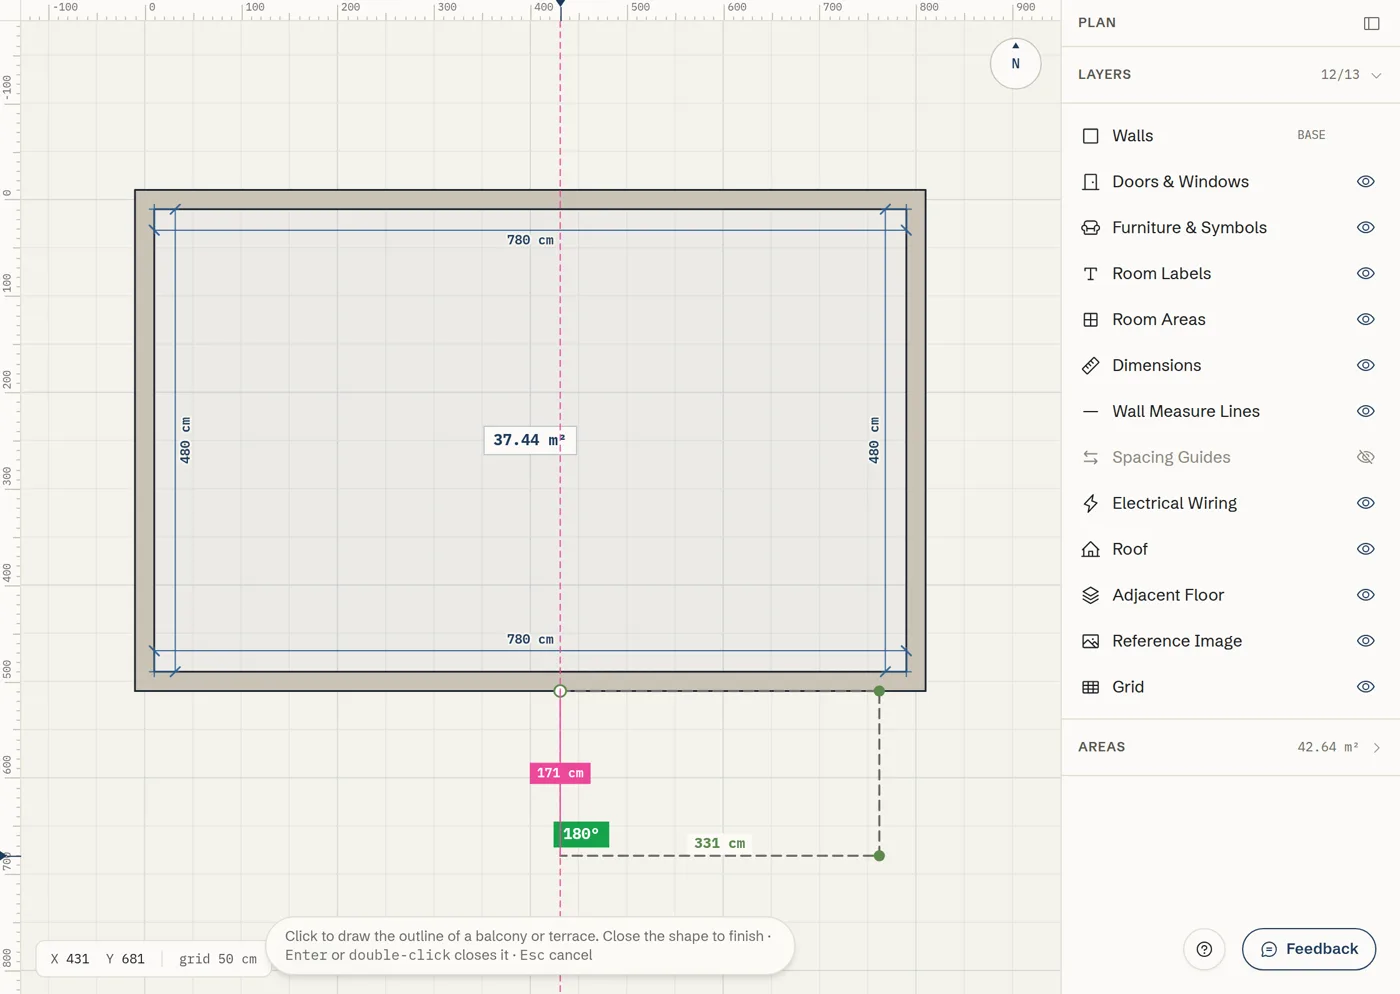
Click each corner on the plan. Corners snap to the outside faces and outer corners of the walls, the same way a roof outline does, so the balcony meets the facade exactly. Close the shape by clicking the first corner again, by pressing Enter, or with a double-click. It needs at least three corners.
It is created and selected
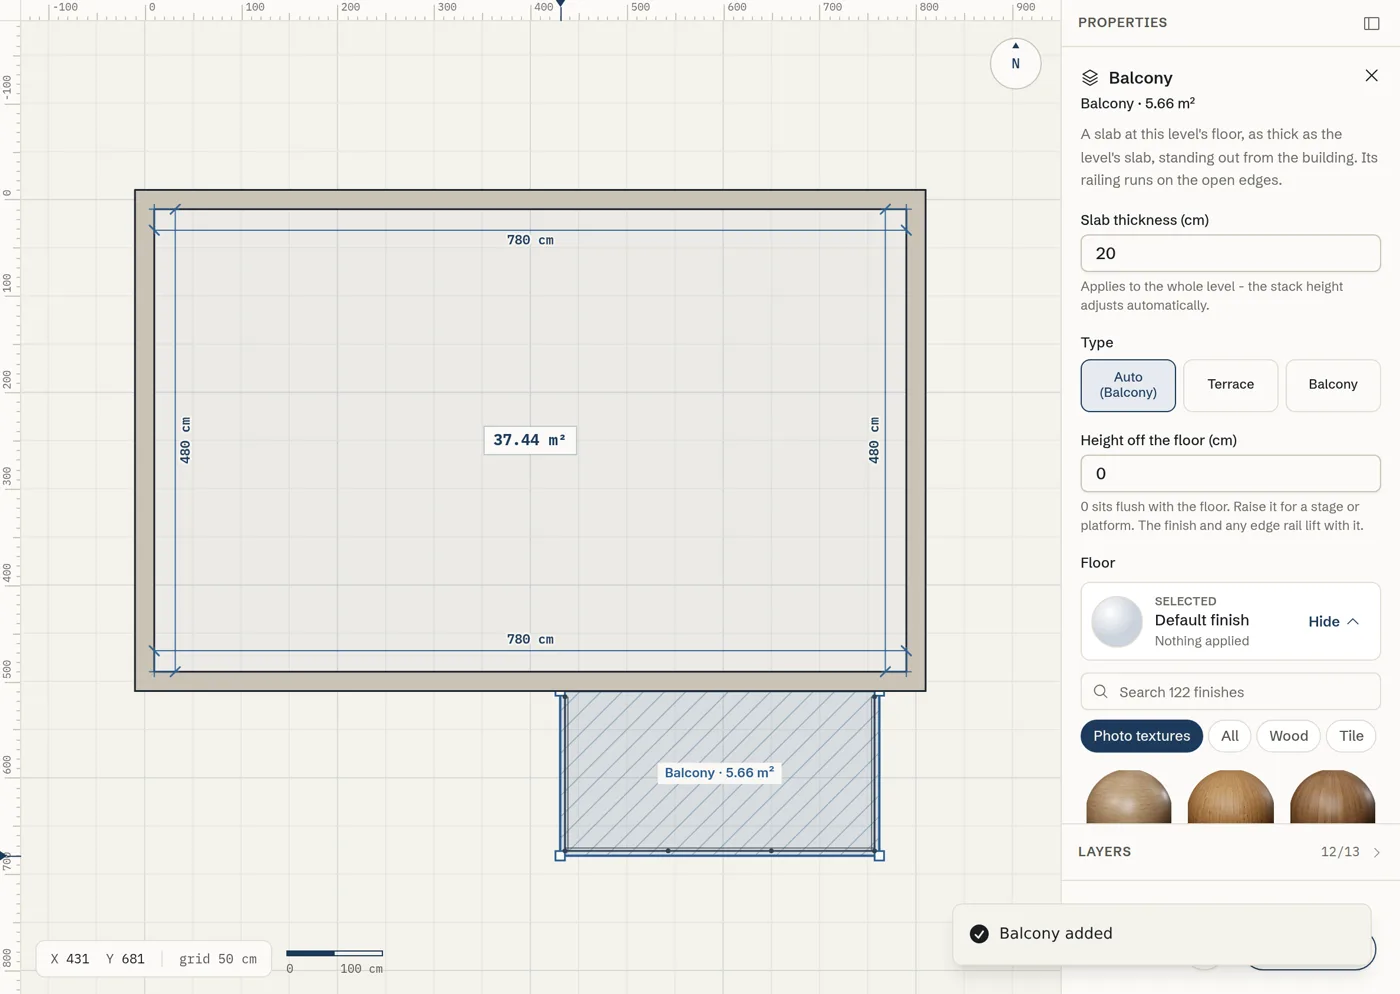
As soon as the shape closes, the piece is made, selected and its panel opens on the right. On the plan it shows as a light hatch with its name and area, for example Balcony · 6.86 m² or Terrace · 12.50 m².
Balcony or terrace follows the floor
On a floor with another floor under it, the piece is a Balcony. On the ground floor, or a floor with nothing under it, it is a Terrace. The label follows the floor by itself; to pin it, pick Terrace or Balcony under Type instead of Auto.
Give it a finish
Under Floor in that panel, pick decking, tile, stone or concrete from the finish picker. Photo textures come first.
Raise a terrace (optional)
For a terrace, set Raised by. 0 sits at ground level; raise it for a deck or a platform, and tick Add a step along the open edges for a step down to the garden. A terrace raised 45 cm or more gets its railing automatically.
Railings
A balcony gets its railing automatically
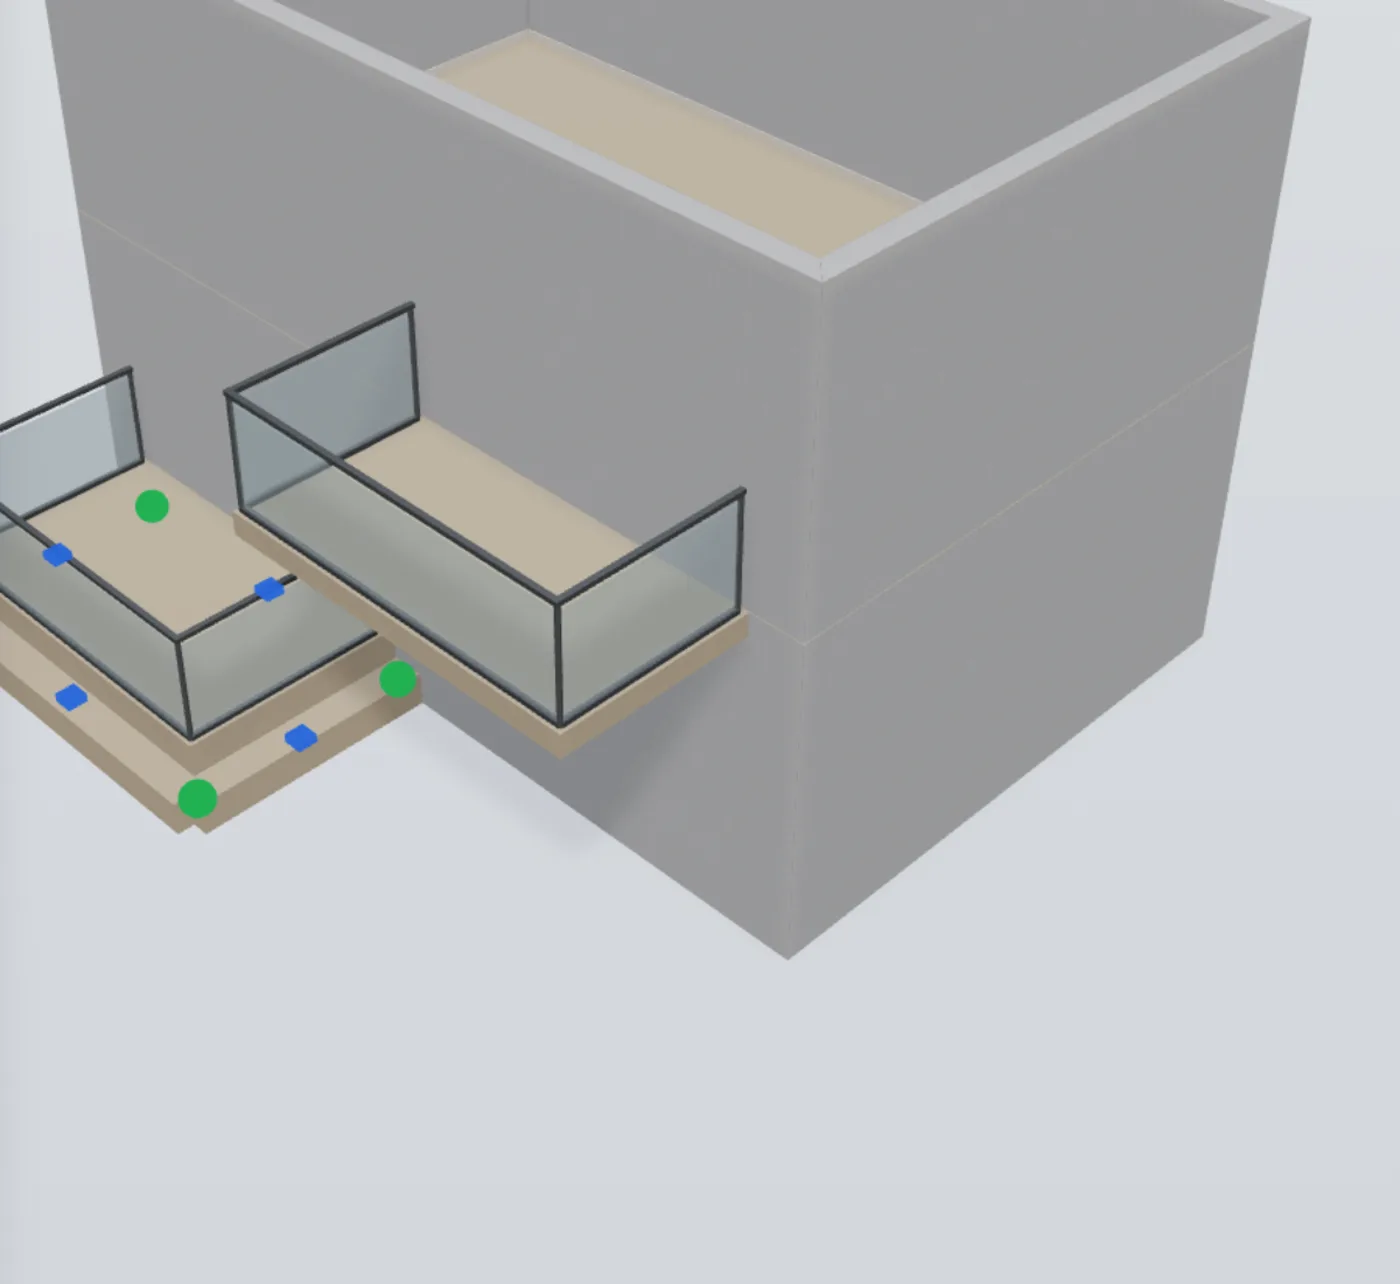
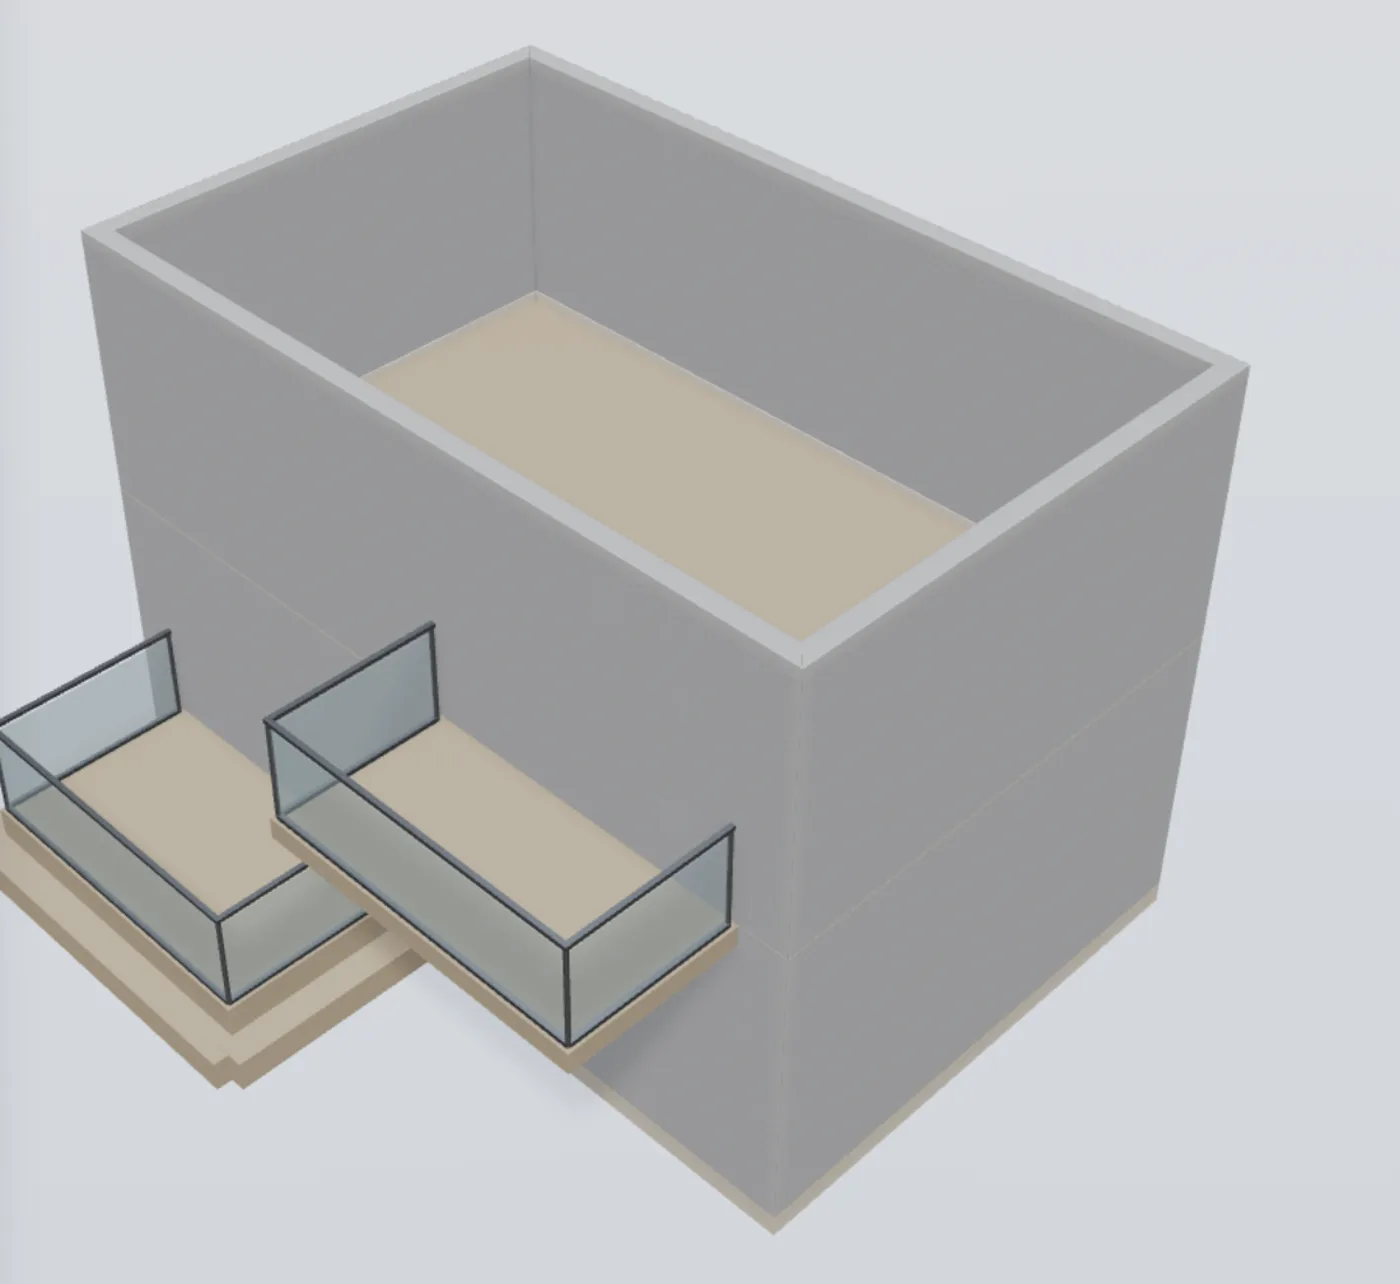
A new balcony gets a glass railing on its open edges only: never along the wall it stands against (so a door onto the balcony stays clear), and it ends exactly on the wall face it meets. If you move a corner or a wall, the railing follows.
Change the type and height
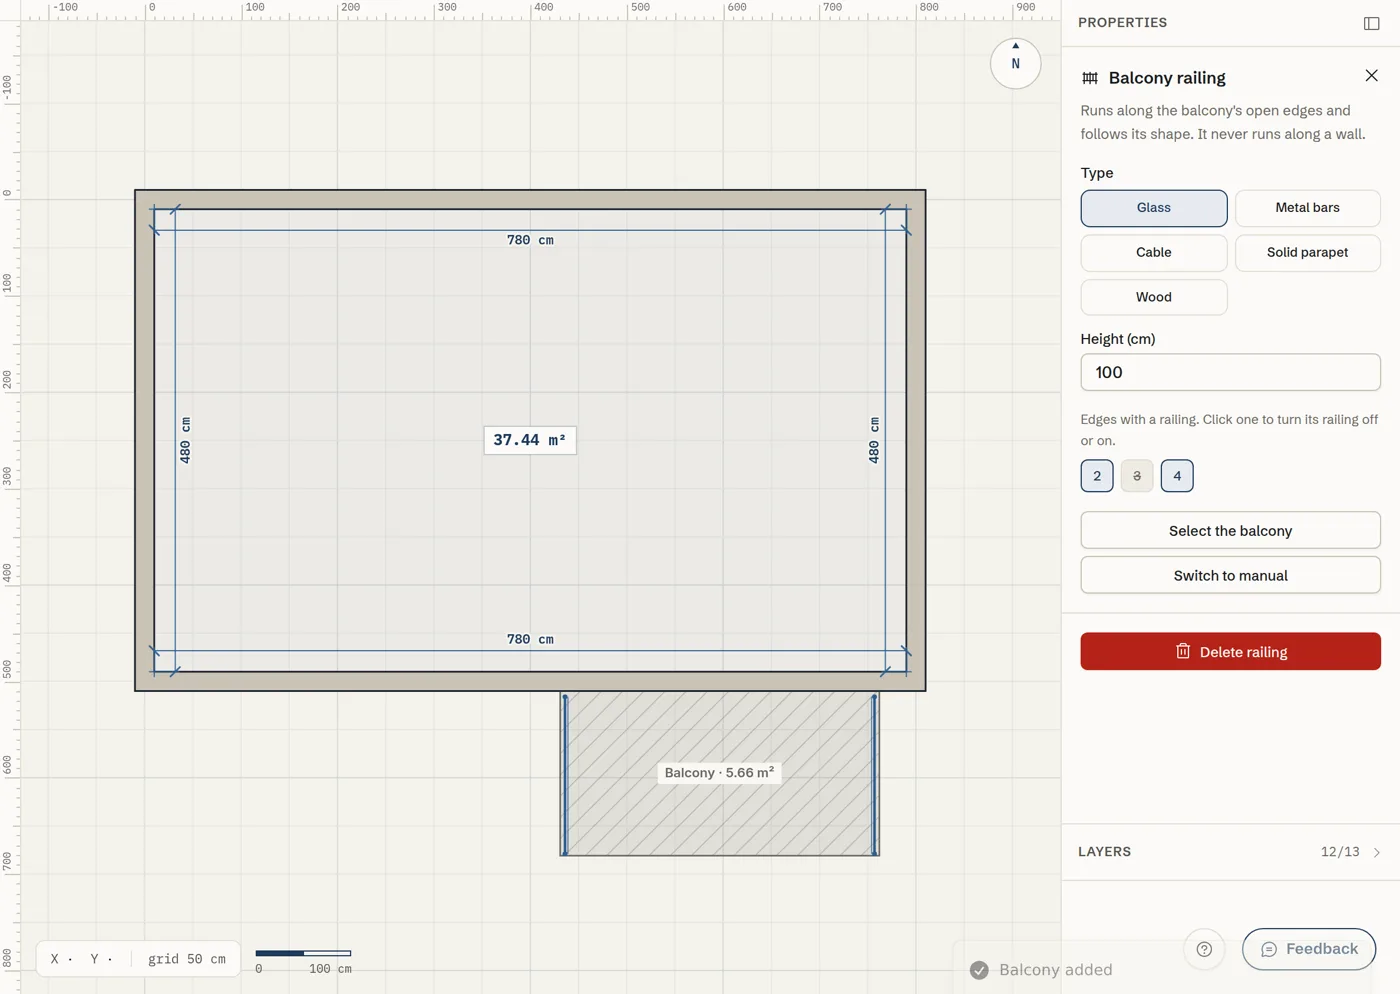
Select the balcony, or click its railing on the plan. Pick Glass, Metal bars, Cable, Solid parapet or Wood, and set the Height (100 cm by default).
Turn one edge on or off
Under the railing settings, each open edge has a numbered chip. Click one to remove that edge's railing, and click it again to put it back.
Draw a railing anywhere
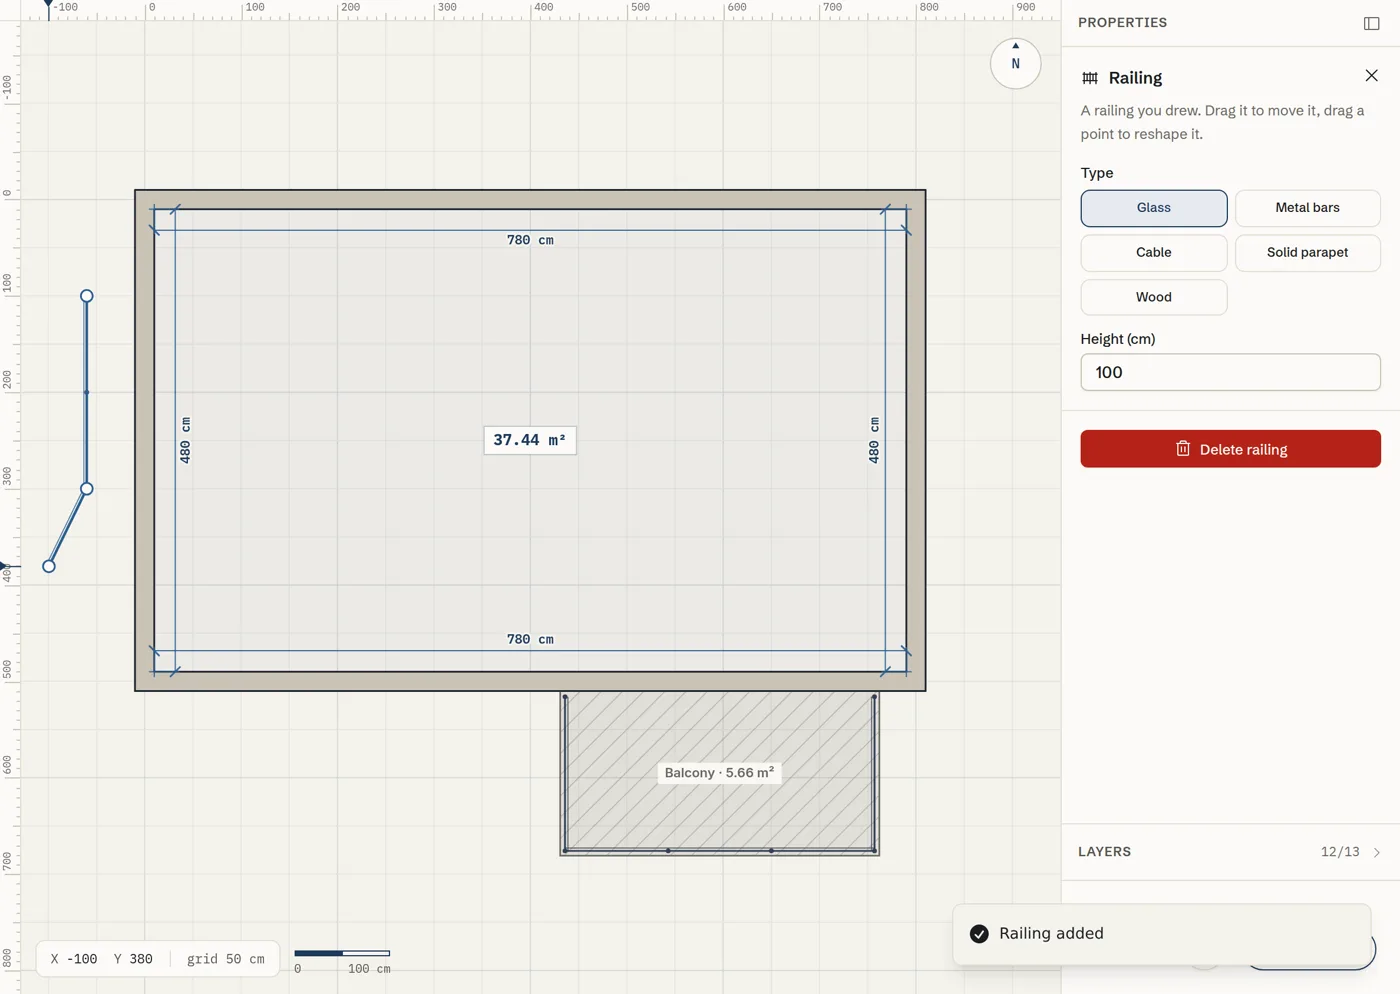
Click Railing under Structure, then click points: on a balcony edge, along a stair landing, a mezzanine edge or in the garden. It snaps to wall faces, corners and balcony edges, and to the exact point where a balcony edge meets the wall (the marker reads Edge × outer face, Edge × inner face or Edge × centreline), so the railing ends flush on the wall. Dragging a point snaps the same way. Press Enter or double-click to finish; it stays an open line. Select it to change its type and height, drag it to move it, drag a point to reshape it, or press Delete.
Switch a balcony to manual
Click Switch to manual to turn the automatic railing into ordinary railings where it stands. They stop following the balcony, and you can edit each one freely. No railing removes it; Add an automatic railing brings it back.
In elevations and exports
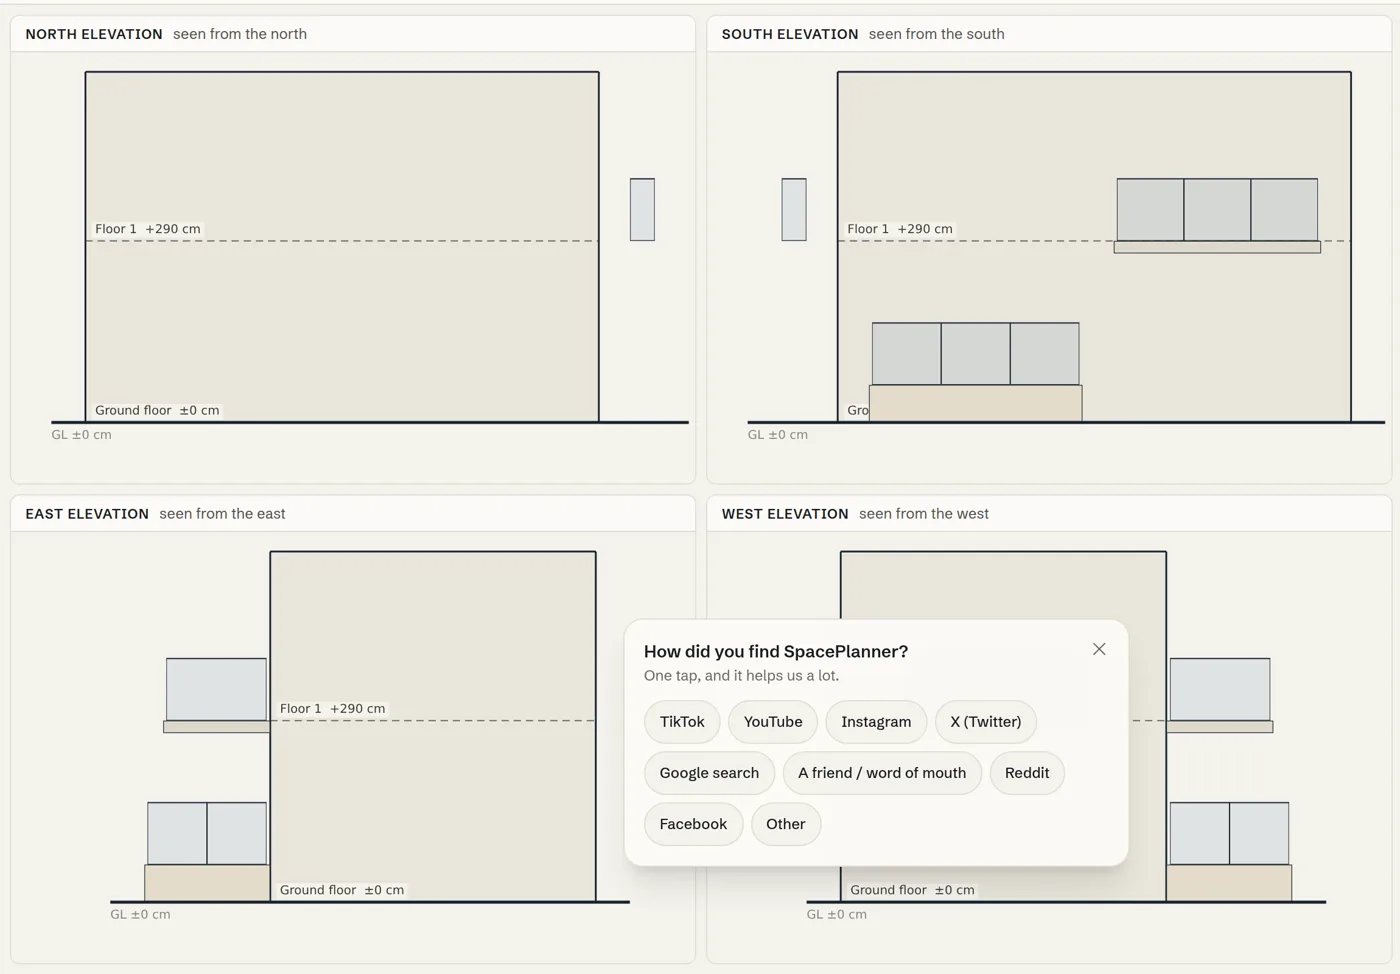
Balconies, terraces and railings show in the 3D view, in the Elevation workspace and on exported plan and elevation sheets.
Reshape or move a slab
Select it in 3D
Switch to 3D and click the slab. Grips appear on it.
Drag the green corners
Green corners move one corner freely in any direction. Use them to square the slab into a rectangle.
Drag the blue edges
Blue edges push or pull a whole side. Moves snap to 5 cm; hold Alt for 1 cm steps.
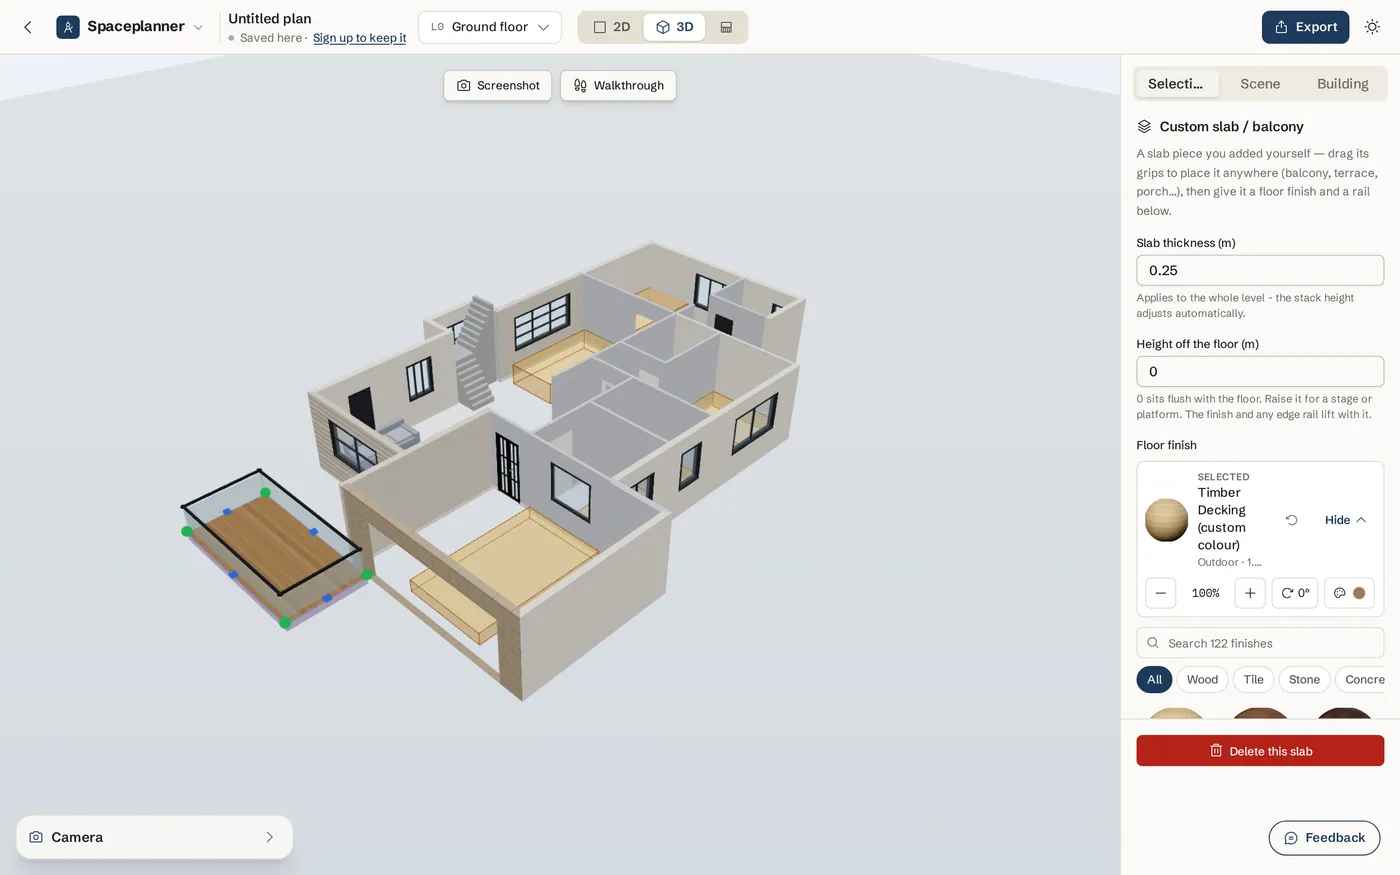
Move it on the 2D plan
Select the balcony or terrace on the plan and click Move balcony (or Move terrace) in its panel, then drag it once to its new place. Esc cancels. The arrow keys nudge it too (Shift for 10 cm). Its automatic railing moves with it. A plain drag inside it draws a selection box instead.
Delete a balcony or terrace
Click Delete this balcony (or terrace) at the bottom of its panel, or press Delete. Its automatic railing goes with it. Ctrl+Z brings both back.
Change the automatic floor slab
Select the structural slab
In 3D, click the concrete floor plate under a level. Its Structural slab panel opens. The slab follows every enclosed room on that level plus its balconies, with openings cut for stairwells. Drawing a floor over only part of a room does not shrink it.
Set the slab thickness
Type a new Slab thickness, here or in the Floor properties of any floor on that level. It applies to the whole level, and the height of the floors stacked above adjusts automatically. On an upper level the slab hangs below the floor: it is the ceiling of the level below. New plans start with a 20 cm slab.
Remove a piece you do not want
Click Remove this slab piece, for example over a double-height space. Removed pieces can be restored anytime: open the floor menu (the plan name at the top left of 3D) and click Restore next to the removed count under Levels.
Reset a reshaped slab
If you dragged a structural piece and want it to follow the rooms again, click Reset shape to auto (follow rooms).
Tips
- For a raised or sunken area inside a room, like a step down into a living room, use the Elevation of the floor instead. See the sunken rooms guide.
- A balcony selected on the 2D plan shows the same panel as in 3D, so you can finish or delete it without leaving 2D. On the plan, drag its corners to reshape it. Dragging inside it does not move it (it draws a selection box, so you can pick the furniture on it). To move the whole balcony or terrace, click Move balcony (or Move terrace) in its panel and drag it once, or nudge it with the arrow keys (Shift for 10 cm). Its automatic railing moves with it. Esc cancels the move.
- Drawn inside the building, the shape is still made (a covered terrace, say), with a note to use Floor for indoor floors.
- On an upper floor, if you trace a floor area with the Floor tool (F) that sticks out past the outer walls, the editor offers Make it a balcony, so the area gets a slab of its own instead of floating.
- The slab of the floor above sits inside the wall height of the level below. The wall panel shows Gross height (clear height plus the slab).
Common problems
- My upper floor looks like it floats with no floor under a room
- The automatic slab only covers rooms enclosed by walls. Close the walls around the room, or draw the missing part with Balcony & terrace (S).
- I removed a slab piece by mistake
- In 3D, open the floor menu (the plan name at the top left) and click Restore next to the removed slab pieces under Levels.
- The balcony rail blocks the door to the house
- The automatic railing never runs along the wall, so a door in that wall stays open. On an older balcony with an edge rail, select it and click Add an automatic railing, or switch off the rail on the edge that touches the building.
- My terrace has no railing
- A terrace gets its railing only once it is raised 45 cm or more. Raise it, or draw one with the Railing tool.
- The whole building got taller when I changed the slab
- Slab thickness applies to the whole level and the stack height follows it. Set it back to the old value, for example 20 cm.
Related topics
- Floors & levelsAdd floors and basements, switch between them, and make each storey line up with the one below.
- Sunken and raised floorsSet a floor area higher or lower than the rest of the level, then add steps that fit the height difference.
- Finishes and materialsOne finish picker for floors, walls, stairs and furniture: pick a material or paint, then adjust scale, grain and tint.
- 3D view & walkthroughSee the same plan in live 3D, light it, look inside, save views, walk through it and turn a view into a realistic photo.
- Lot, garden and outdoorDraw the property boundary and ground surface, then add patios, plants, trees, a pool and outdoor furniture.
Try it on a real plan
Free, in your browser. No sign-up needed to start.